You can add images on top of your map as a Tile Layer. Tile Layers are placed overtop of a map tile at a specific zoom level. With enough tiles, you can supplement Google's map data for the entire map, at multiple zoom levels.
Introduction
Tile layers (sometimes referred to as Tile Overlays) allow you to superimpose
images on top of Google's base map tiles. This is an excellent way to add data
- such as points of interest or traffic information - and local imagery to
your app. When combined with thekGMSTypeNonemap type,
tile layers effectively let you replace Google's base map data with your own.
Tile layers are useful when you wish to add extensive imagery, typically covering large geographical areas, to the map. By contrast,ground overlaysare useful when you wish to fix a single image at one point on the map.
Tile coordinates
The Maps API breaks up imagery at each zoom level into a set of square map tiles, which are arranged in an ordered grid. When a map scrolls to a new location, or to a new zoom level, the Maps API determines which tiles are needed, and translates that into a set of tiles to retrieve.
For Google's implementation of the Mercator projection, the tile with
coordinate (0,0) is always at the northwest corner of the map, withxvalues
increasing from west to east andyvalues increasing from north to south.
Tiles are indexed usingx,ycoordinates from that origin. For example, at
zoom level 2, when the earth is divided up into 16 tiles, each tile can be
referenced by a uniquex,ypair:
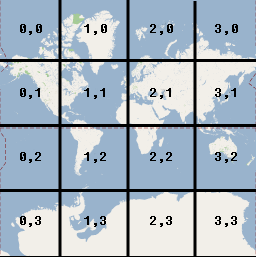
Each map tile is a 256x256 point square. At zoom level 0, the entire world is rendered in a single tile. Each zoom level increases the magnification by a factor of two. So, at zoom level 1 the map will be rendered as a 2x2 grid of tiles, or a 4x4 grid at zoom level 2, a 8x8 grid at zoom level 3, and so on. If you are creating images for a tile layer, you will need to create a new 256x256 point image for each tile at each zoom level that you wish to support.
Adding a Tile Layer
- Instantiate a
GMSURLTileLayerobject, or a custom subclass ofGMSTileLayer/GMSSyncTileLayer. - Optionally modify the
zIndexproperty to adjust its position in relation to other tile layers. - Assign the
GMSTileLayerobject to the map by setting itsmapproperty.
The Maps SDK for iOS provides three classes that can be used to
implement a tile layer. With each class, you will need to define how to fetch
the correct map tile for a given set of{x,y,zoom}coordinates. The
available options are:
- Subclass
GMSSyncTileLayer,providing the implementation oftileForX:y:zoomthat returnsUIImageinstances. - Subclass
GMSTileLayer,providing the implementation of the asynchronous methodrequestTileForX:y:zoomthat later calls back with a tile image. - Use the existing class,
GMSURLTileLayer,to fetch tiles automatically from URLs, providing theGMSTileURLConstructorblock.GMSURLTileLayeris a concrete class that cannot be subclassed.
In the case of subclassingGMSSyncTileLayerorGMSTileLayer,providing a
niltile result will tell the Maps SDK for iOS that data is currently
unavailable but that it may be available in the future. Alternatively,
returnkGMSTileLayerNoTileto indicate that there is no tile at this
location.
ForGMSURLTileLayer,returningnilfrom theGMSTileURLConstructorwill
indicate that there is no tile at this location.
Using `GMSURLTileLayer` to fetch tiles from URLs
TheGMSURLTileLayerdoes not require subclassing, but you will have to
implement theGMSTileURLConstructorblock. The below code shows how to
useGMSURLTileLayerto display the floor plan of a multistory building.
Swift
letfloor=1

// Implement GMSTileURLConstructor
// Returns a Tile based on the x,y,zoom coordinates, and the requested floor
leturls:GMSTileURLConstructor={(x,y,zoom)in
leturl="https:// example /floorplans/L\(floor)_\(zoom)_\(x)_\(y).png"
returnURL(string:url)
}

// Create the GMSTileLayer
letlayer=GMSURLTileLayer(urlConstructor:urls)

// Display on the map at a specific zIndex
layer.zIndex=100
layer.map=mapView
Objective-C
NSIntegerfloor=1;

// Create the GMSTileLayer
GMSURLTileLayer*layer=[GMSURLTileLayertileLayerWithURLConstructor:^NSURL*_Nullable(NSUIntegerx,NSUIntegery,NSUIntegerzoom){
NSString*url=[NSStringstringWithFormat:@"https:// example /floorplans/L%ld_%lu_%lu_%lu.png ",
(long)floor,(unsignedlong)zoom,(unsignedlong)x,(unsignedlong)y];
return[NSURLURLWithString:url];
}];

// Display on the map at a specific zIndex
layer.zIndex=100;
layer.map=mapView;
SubclassGMSSyncTileLayerto serve tiles as aUIImage
TheGMSSyncTileLayerandGMSTileLayerare abstract classes designed to be
subclassed. You can use these classes to serve tiles asUIImage's. The below
example shows how to render a custom image over some of the tiles on the map
by subclassingGMSSyncTileLayer.
Swift
classTestTileLayer:GMSSyncTileLayer{
overridefunctileFor(x:UInt,y:UInt,zoom:UInt)->UIImage?{
// On every odd tile, render an image.
if(x%2==1){
returnUIImage(named:"australia")
}else{
returnkGMSTileLayerNoTile
}
}
}
Objective-C
@interfaceTestTileLayer:GMSSyncTileLayer
@end

@implementationTestTileLayer

-(UIImage*)tileForX:(NSUInteger)xy:(NSUInteger)yzoom:(NSUInteger)zoom{
// On every odd tile, render an image.
if(x%2==1){
return[UIImageimageNamed:@"australia"];
}else{
returnkGMSTileLayerNoTile;
}
}

@end
To add the layer to your map, instantiate the object and set its map property.
Swift
letlayer=TestTileLayer()
layer.map=mapView
Objective-C
GMSTileLayer*layer=[[TestTileLayeralloc]init];
layer.map=mapView;
High DPI Tiles for Retina devices
You can use high DPI images with eitherGMSSyncTileLayer
orGMSURLTileLayerby setting thetileSizeto 512.
ThetileSizeproperty indicates the number of pixels that the returned tile
images will prefer to display as; this defaults to 256 — the dimension
of a Google Maps tile on a non-Retina device.
If you are displaying normal DPI tiles on a high DPI device you can scale the
images up by settingtileSizeto 512. Note that upscaling images may reduce
image quality, especially for fine lines or text. For best results, match the
tileSizeand image DPI to the display. Maps shown on a Retina device will
look their best when displaying high DPI images with atileSizeof 512;
while maps shown on a non-Retina device will look great with normal images
and the defaulttileSizeof 256.
Clearing stale tiles
If the tiles provided by the layer become 'stale', then the method
clearTileCacheshould be called on the layer to force a refresh. This will
cause all of the tiles on this layer to be reloaded.
Swift
layer.clearTileCache()
Objective-C
[layerclearTileCache];