Add server-side logic
Validate and process user actions and data in your app using backend code.
With Stripe Apps, you can add server-side logic with a self-hosted backend. With a self-hosted backend service, you can:
- Integrate securely with third-party systems that require a server-side integration.
- Subscribe towebhookevents from Stripe and synchronize Stripe with other systems.
- Use long-lived app logic that executes when the user closes the browser.
- Build apps that provide cron-job-like functionality to schedule specific actions.
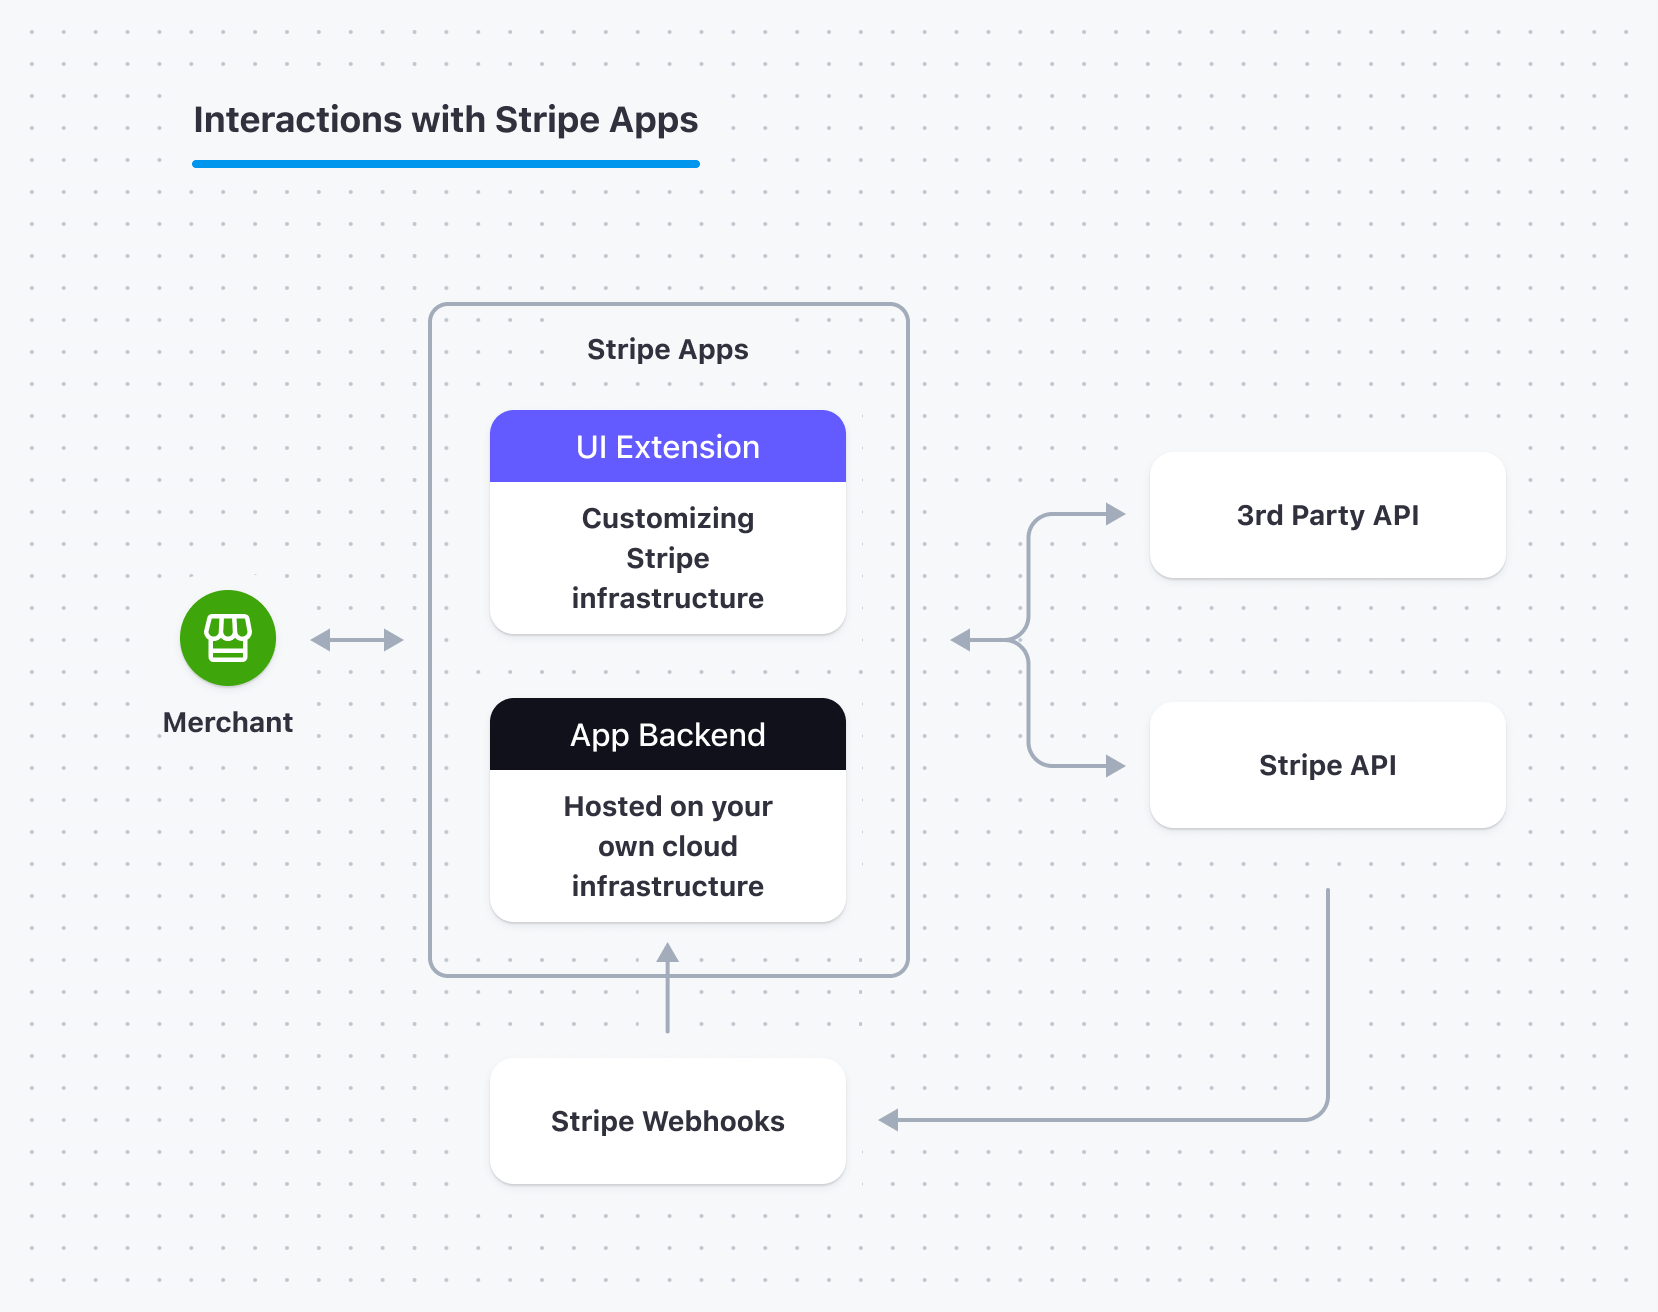
How the self-hosted backend relates to the app
Authenticate users from your UI to your app's backend
To authenticate a user from the Dashboard, the backend needs a signature with the shared secret and the account and user ID of the current, signed-in Dashboard user. If your user doesn’t have permission to call the API, Stripe returns aPermission error.
Before you begin
Make sure your backend service can send and receive HTTP requests. If you haven’t built an API server before, consider trying theinteractive webhook endpoint builder.
Create your shared secret byuploading your app:
Command Linestripeapps uploadDon’t worry if you haven’t finished developing the current version of your app, uploading won’t update your app in live mode.
Get your app’s secret to verify the signature in your backend:
a. Go to yourStripe appdetails page by selecting your app fromApps.
b. Under the application ID, click the overflow menu (), then clickSigning secretto open the signing secret dialog.
c. Click the clipboardto copy your app’s secret from the signing secret dialog.
Send a signed request
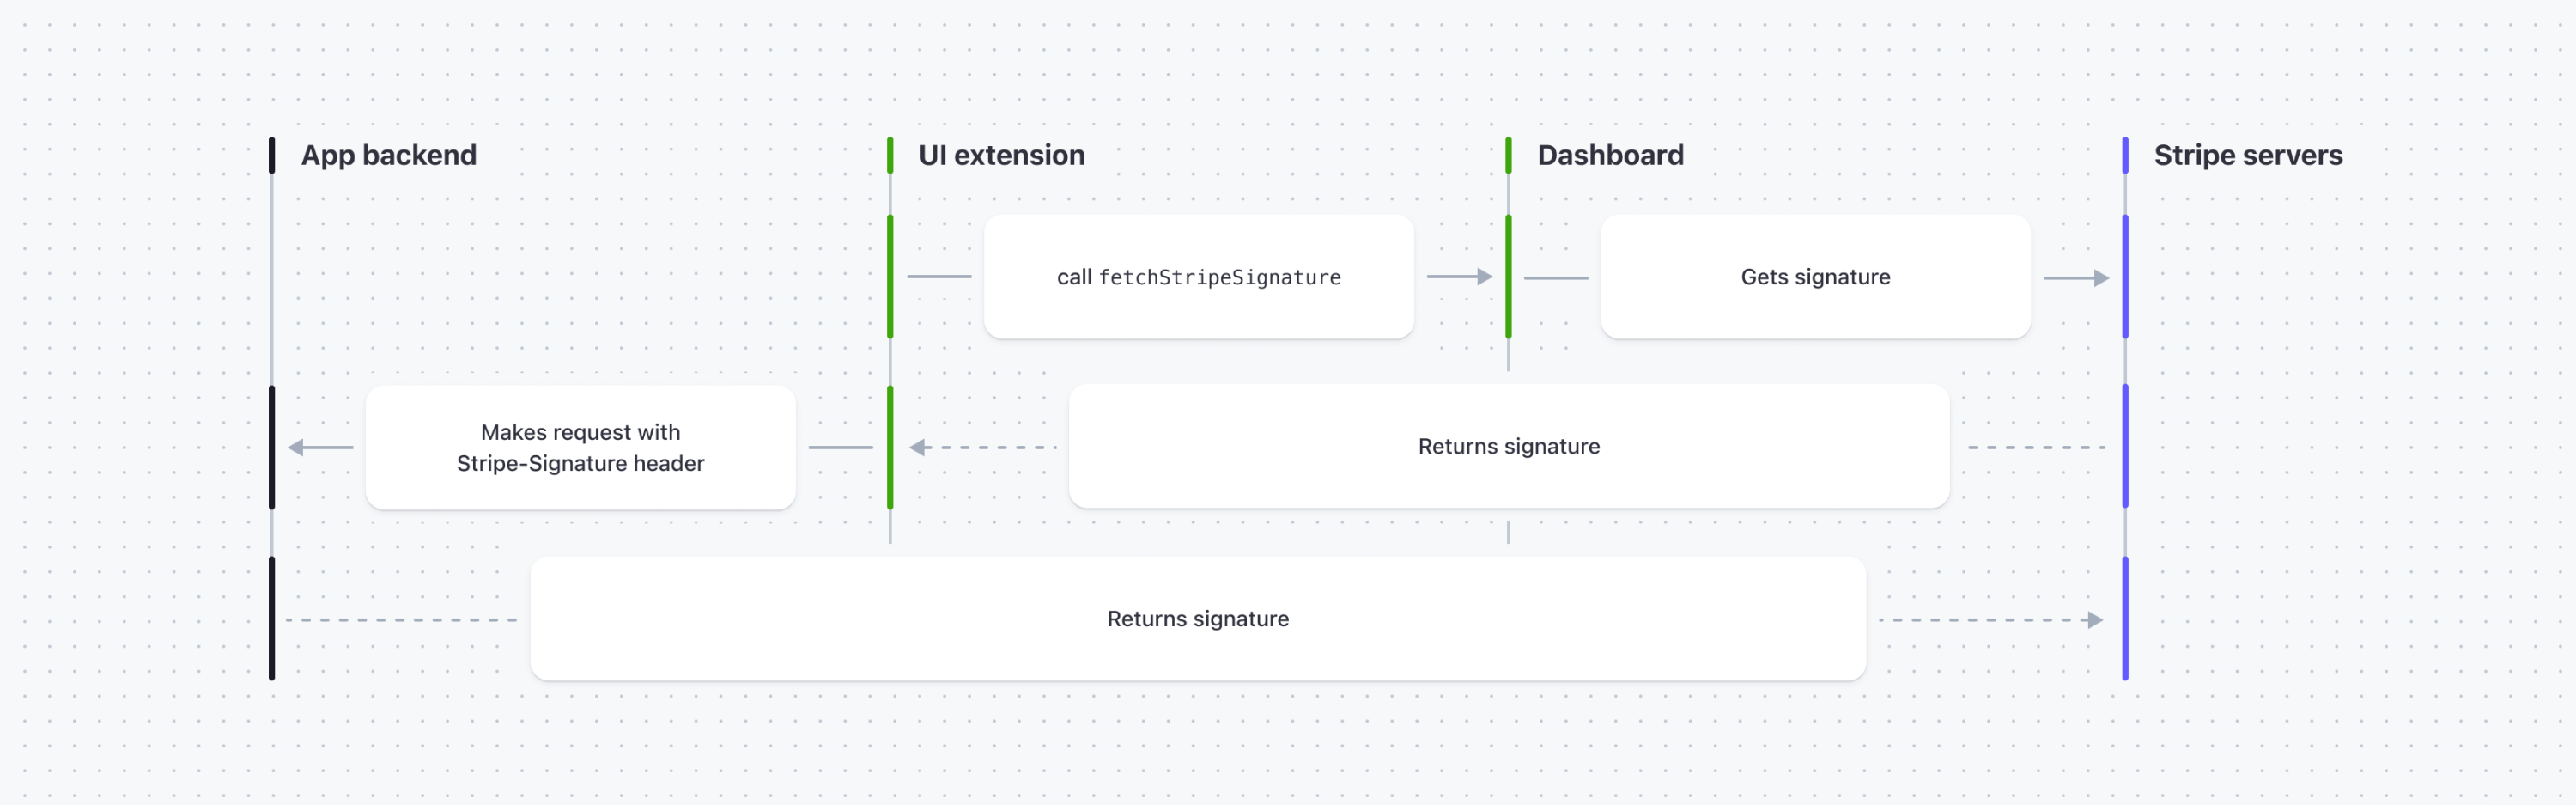
To send a signed request to the app’s backend:
- Get the current signature using thefetchStripeSignatureasynchronous function.
- Add the signature to the
Stripe-Signatureheader. - Include the
user_andid account_objects in the request.id - On the app’s backend, verify that the request includes the signature, app secret,
user_,andid account_.id
See anexample of sending a signed request with additional data.
An example request from a Stripe app with theStripe-Signatureheader:
import{fetchStripeSignature}from'@stripe/ui-extension-sdk/utils';

constApp=({userContext,environment}:ExtensionContextValue)=>{
constmakeRequestToMyBackend=async(endpoint,requestData)=>{
// By default the signature is signed with user id and account id.
constsignaturePayload={
user_id:userContext?.id,
account_id:userContext?.account.id,
};
returnfetch(`https://example.com/${endpoint}/`,{
method:'POST',
headers:{
'Stripe-Signature':awaitfetchStripeSignature(),
'Content-Type':'application/json',
},
// Include the account ID and user ID in the body to verify on backend.
body:JSON.stringify({
...requestData,
...signaturePayload,
}),
});
};
...
}
Sample backend verifying the request:
Please be aware that the order and naming of the payload fields matters when performing signature verification.Theuser_precedes theaccount_and the resulting object is as follows:{ user_
// Set your secret key. Remember to switch to your live secret key in production.
// See your keys here:https://dashboard.stripe.com/apikeys
conststripe=require('stripe')(process.env.STRIPE_API_KEY);
constexpress=require('express');

// Find your app's secret in your app settings page in the Developers Dashboard.
constappSecret='absec_...';

// This example uses Express.
constapp=require('express')();
app.use(express.json());

// Match the raw body to content type application/json.
app.post('/do_secret_stuff',(request,response)=>{
constsig=request.headers['stripe-signature'];
// Retrieve user id and account id from the request body
constpayload=JSON.stringify({
user_id:request.body['user_id'],
account_id:request.body['account_id']
});
try{
// Verify the payload and signature from the request with the app secret.
stripe.webhooks.signature.verifyHeader(payload,sig,appSecret);
}catch(error){
response.status(400).send(error.message);
}
// Handle the request by returning a response
// to acknowledge receipt of the event.
response.json({success:true});
});

app.listen(3000,()=>console.log('Running on port 3000'));
Send a signed request with additional data
You can authenticate a user by sending a signed request with a payload (additional data). When you call thefetchStripeSignaturefunction with an additional payload request, you create a signature withuser_,account_and the additional payload you passed into the function. By default, Stripe apps useuser_andaccount_to generate the signature string.
An example of generating a secret with additional payload:
// A valid payload object has keys of type string
// and values of type string, number, or boolean.
constpayload={
"transaction_id":'ipi_1KRmFUFRwUQjTSJEjRnCCPyV',
"amount":100,
"livemode":false,
};

fetch(`https://example.com/do_more_secret_stuff/`,{
method:'POST',
headers:{
'Stripe-Signature':awaitfetchStripeSignature(payload),
'Content-Type':'application/json',
},
// Append the account ID and user ID in the body to verify on backend.
body:JSON.stringify({
...payload,
user_id:'usr_K6yd2CbXLO9A5G',
account_id:'acct_1JSkf6FRwUQjTSJE',
}),
});
Sample backend verifying the signature generated with additional payload:
// Match the raw body to content type application/json.
app.post('/do_more_secret_stuff',(request,response)=>{
try{
// Verify the signature from the header and the request body that
// contains the additional data, user ID, and account ID with the app secret.
stripe.webhooks.signature.verifyHeader(request.body,sig,appSecret);
}catch(error){
response.status(400).send(error.message);
}
// Handle the request by returning a response
// to acknowledge receipt of the event.
response.json({success:true});
});
Verify user roles (optional)
You can verify the user roles assigned to a givenuser_by including thestripe_key in the payload. Provide this withuserContext?.,which returns a list ofRoleDefinitions.If any role in the payload isn’t assigned to theuser_provided,fetchStripeSignaturereturns an invalid request error (400).
// Provide this special key in the same way you'd
// provide any other key to the additional payload.
constpayload={
"stripe_roles":userContext?.roles,
};

fetch(`https://example.com/do_more_secret_stuff/`,{
method:'POST',
headers:{
'Stripe-Signature':awaitfetchStripeSignature(payload),
'Content-Type':'application/json',
},
// Append the account ID and user ID in the body to verify on backend.
body:JSON.stringify({
...payload,
user_id:'usr_K6yd2CbXLO9A5G',
account_id:'acct_1JSkf6FRwUQjTSJE',
}),
});
Expire and create secrets
If your secret is compromised, you can expire your current app’s secret immediately for up to 24 hours to update the app’s secret on your backend. During this time, two secrets are active for the endpoint, the compromised secret and the newly generated secret. Stripe generates one signature per secret until expiration.
To expire and create an app secret:
- Go to yourStripe appdetails page by selecting your app fromApps.
- On the page header, click the overflow menu (), then clickSigning secretto open the Signing secret dialog.
- ClickExpire secretfrom the signing secret dialog to open the Expire secret dialog.
- Select an expiration duration for your current’s app secret.
- ClickExpire secret.
Handle Cross-Origin Resource Sharing (CORS)
Cross-Origin Resource Sharing (CORS)is an important part of helping keep apps secure fromcross-site scripting attacks (XSS).Because Stripe App UI extensions are, by necessity, cross-origin and sandboxed, you must employ a specific approach to handling cross-origin request headers.
For your UI extension to retrieve data from your backend service, you must configure your backend service to do the following:
- Allow requests using theOptions method.
- To allow requests from
nullorigins, set theAccess-Control-Allow-Originto*.
Note
UI extensions have a null origin because they run in a sandbox for security purposes.
Many backend frameworks have libraries and guidance to help you handle CORS. Check the documentation for your framework for more specific guidance.
To authenticate that a request came from Stripe on behalf of a particular user or account, seeAuthenticate users from your UI to your backend.
Caution
Only configure authenticated endpoints and any endpoints the UI extension communicates with to useAccess-Control-Allow-Origin: *.Unauthenticated endpoints are vulnerable toCSRFattacks if no other measures are in place.
Use Stripe APIs
To interact with Stripe, you can use and authenticate your requests to the Stripe API.
Authenticating requests
To authenticate your requests, use your existing merchant account API key to interact with Stripe and specify the user’sstripeAccountId.
For server-side API calls, you can make requests as connected accounts using the special headerStripe-Accountwith the Stripe account identifier (it starts with the prefixacct_) of your platform user. Here’s an example that shows how toCreate a PaymentIntentwith your platform’sAPI secret keyand your user’sAccountidentifier.
TheStripe-Accountheader approach is implied in any API request that includes the Stripe account ID in the URL. Here’s an example that shows how toRetrieve an accountwith your user’sAccountidentifier in the URL.
In addition, all of Stripe’s server-side libraries support this approach on a per-request basis, as shown in the following example:
Call your self-hosted backend from your UI extension
When you make requests from your UI extension to your backend,send a signature with your requestto validate the legitimacy of the requests. From the UI extension, pass thestripeAccountIdfor the current user so that you can make backend requests on behalf of that user.
// Set your secret key. Remember to switch to your live secret key in production. // See your keys here:https://dashboard.stripe.com/apikeys conststripe=require('stripe')(); constexpress=require("express"); constapp=express(); app.use(express.static("public")); app.use(express.json()); app.post("/api/data",async(req,res)=>{ const{stripeAccountId}=req.body; constcustomer=awaitstripe.customers.create({ description:'My First Test Customer (created for API docs)', },{ stripeAccount:stripeAccountId, }); res.send({ data:[] }); }); app.listen(3000,()=>console.log("Node server listening on port 3000!"));'sk_test_4eC39HqLyjWDarjtT1zdp7dc'
Call other APIs
From your self-hosted backend, you can call any API—your own API or one built by another developer or company.
For more information, learn how tostore secret credentials and tokens in your app.
If you need to pass user information from Stripe to another service, use thestripeAccountIdpassed from your UI extension.
constexpress=require('express');
constfetch=require('isomorphic-fetch');
constapp=express();

app.use(express.static('public'));
app.use(express.json());

app.get('/api/time',async(req,res)=>{
fetch('http://worldclockapi.com/api/json/est/now')
.then((response)=>response.json())
.then((data)=>{
res.send({
data:data,
});
});
});

app.listen(3000,()=>console.log('Node server listening on port 3000!'));
You can alsocall a third-party API from your UI extension.
Receive event notifications about your app
Listen for events (such as user installs or uninstalls) on your Stripe app using incomingwebhooksso your integration can automatically trigger reactions in your backend such as:
- Creating user accounts
- Updating permissions
- Disabling a user’s account and removing data
Receive events
You can receive events from Stripe for an app that’s private to your account only or an app that’s listed on theApp Marketplace:
When a merchant triggers an event, Stripe provides the followingEventobject. This event includes theaccountproperty specifying the account ID of the merchant who triggers the event:
{
"id":"evt_ks76IMqq6qhZ41",
"livemode":true,
"object":"event",
"type":"account.application.authorized",
"account":"acct_ewvU7lexJsbw6h",
"pending_webhooks":2,
"created":1349654313,
"data":{...}
}
Using theaccountattribute, you can do the following:
- Monitor how many merchants install and uninstall your app.
- Make API calls on behalf of users with Stripe Connect.
Events for Stripe Apps
In addition to thetypes of events Stripe supports,Stripe Apps also supports the following events:
| Merchant action | Resulting webhook event sent to the app’s backend |
|---|---|
| Connect or install your app | account.application.authorized |
| Disconnect or uninstall your app | account.application.deauthorized |
Event behavior depends on install mode
Your users can install in live mode, test mode, or both. Set webhooks according to the following guidelines:
- If the app is installed in live mode only, live mode events are sent to the live mode endpoint.
- If the app is installed in test mode only, test mode events are sent to the test mode endpoint.
- If the app is installed in both modes, test mode events are sent to both the test mode and live mode endpoints, and live mode events are sent to the live mode endpoint.
Configure the Connect/webhookfor live and test modes, then use the following snippet for both modes of the app. See thewebhooks docfor a full endpoint example.
Troubleshooting
If you don’t receive expected events, review your configuration for the following common oversights:
- Make sure live mode webhooks use live mode keys and test mode webhooks use test mode keys.
- For live mode events, make sure the installing account is activated.
- Make sure that your app can handle both live mode & test mode events.
- Triggering test events doesn’t replicate live event behavior unless explicitly set up in the app configuration.
Test webhooks locally
You can test webhooks locally for:
- An app that’s only available to all users on your account and listens to events on your own account
- An app that’s available on the Stripe App Marketplace and listens to events on accounts that have installed your app
To test webhooks locally:
Authenticate your account:
Command LinestripeloginOpen two terminal windows:
In one terminal window,Set up event forwarding:
In the other terminal window,Trigger events to test your webhooks integration:
For more information, see our docs ontesting a webhook endpoint.