
Bootstrapping your Terraform automation with Amazon CodeCatalyst
A walk-through of how to set up Terraform with Amazon CodeCatalyst from scratch to create a CI/CD pipeline for your infrastructure
Cobus Bernard
Amazon Employee
PublishedJan 31, 2023
Last ModifiedMar 20, 2024
Terraform is awesome to manage all your infrastructure, but when you have more than one developer trying to make changes to the infrastructure, things can get messy very quickly if there isn't a mechanism (CI/CD pipeline) in place to manage it. Without one, making changes to any infrastructure requires coordination and communication, and the challenge quickly scales the more people that are involved with making these changes. Imagine having to run around shouting"Hey Bob! Hey Jane! You done yet with that DB change? I need to add a new container build job!".As Jeff Bezos said:
"Good intentions never work, you need good mechanisms to make anything happen."
This tutorial will show you how to set up a CI/CD pipeline using AmazonCodeCatalystandTerraform.The pipeline will utilize pull requests to submit, test, and review any changes requested to the infrastructure. We will cover the following topics in this tutorial:
- Using S3 as a backend for Terraformstate files,withDynamoDB for locking,and encrypting the state file at rest with KMS
- CodeCatalyst to run our CI/CD pipelines to create and update all your infrastructure
| About | |
|---|---|
| ✅ AWS experience | 200 - Intermediate |
| ⏱ Time to complete | 30 minutes |
| 💰 Cost to complete | Free tier eligible |
| 🧩 Prerequisites | -AWS Account -CodeCatalyst Account -Terraform1.3.7+ - (Optional)GitHubaccount |
| 💻 Code Sample | Code sample used in tutorial onGitHub |
| 📢 Feedback | Any feedback, issues, or just a👍 / 👎? |
| ⏰ Last Updated | 2023-02-22 |
Automating your infrastructure is a great idea, but you need infrastructure to automate your infrastructure. There are three approaches to doing this:
- Clicking in the console to set everything up, aka"ClickOps"
- Using a CLI to create the resources for you with scripts,"Procedural"
- Using Terraform without storing the state file to bootstrap, then add in the state file configurations to store it
We will be using the 3rd option, have a look at theStack Overflowdiscussion around approaches for more details on the trade-offs.
Let's get started setting this up! Make sure you are logged into your AWS, and CodeCatalyst accounts in the same browser.
Now, let's set up our CodeCatalyst Space and Project. Create a new space by clicking on
Create Spaceon theCodeCatalyst Dashboard,add a name (we will useTerraform CodeCatalyst), add the AWS Account ID to link to for billing (111122223333is a placeholder), you can find your account ID in the top right of your AWS Console, and follow the prompts to link your AWS Account with CodeCatalyst.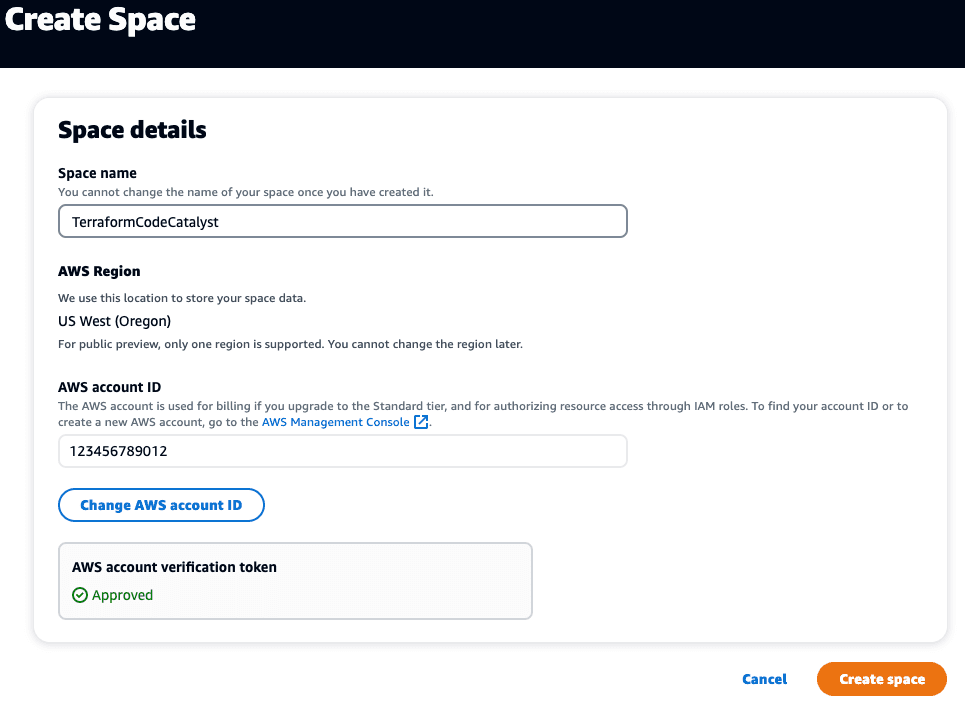
Next, we need to create a new Project, click on the
Create Projectbutton, selectStart from scratch,and give your project a name - we will useTerraformCodeCatalyst.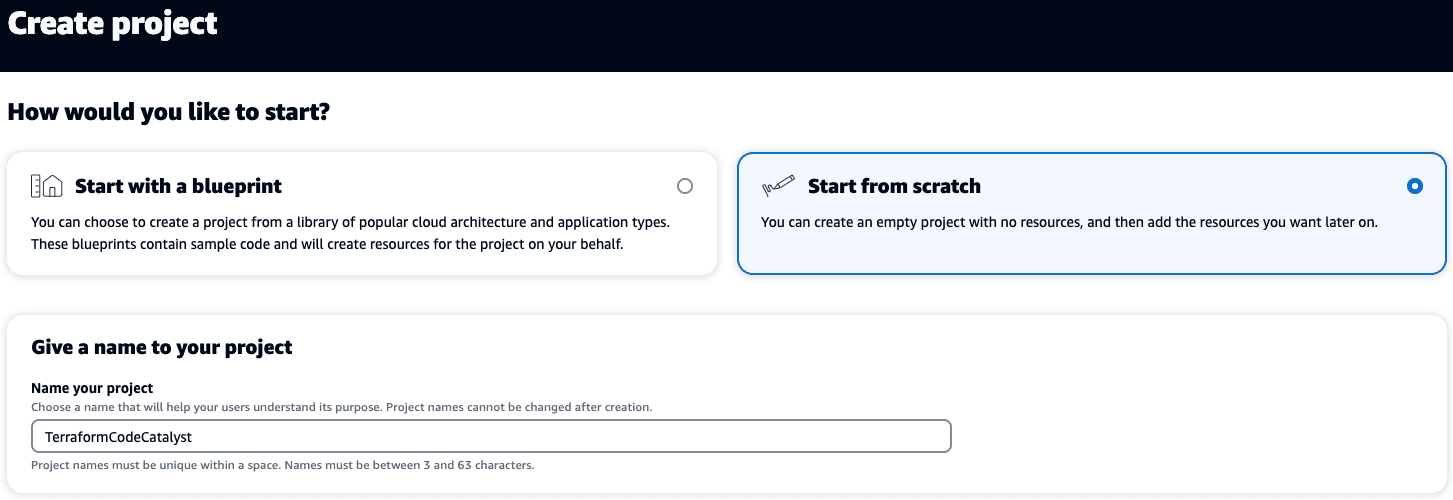
Now we need to create a new repository for our code. Click
Codein the left-side navigation menu, then onSource repositories,Add repositoryand chooseCreate repository.Set a repository name (we will usebootstrapping-terraform-automation-for-amazon-codecatalystin this tutorial), add a description, andTerraformfor the.gitignore file: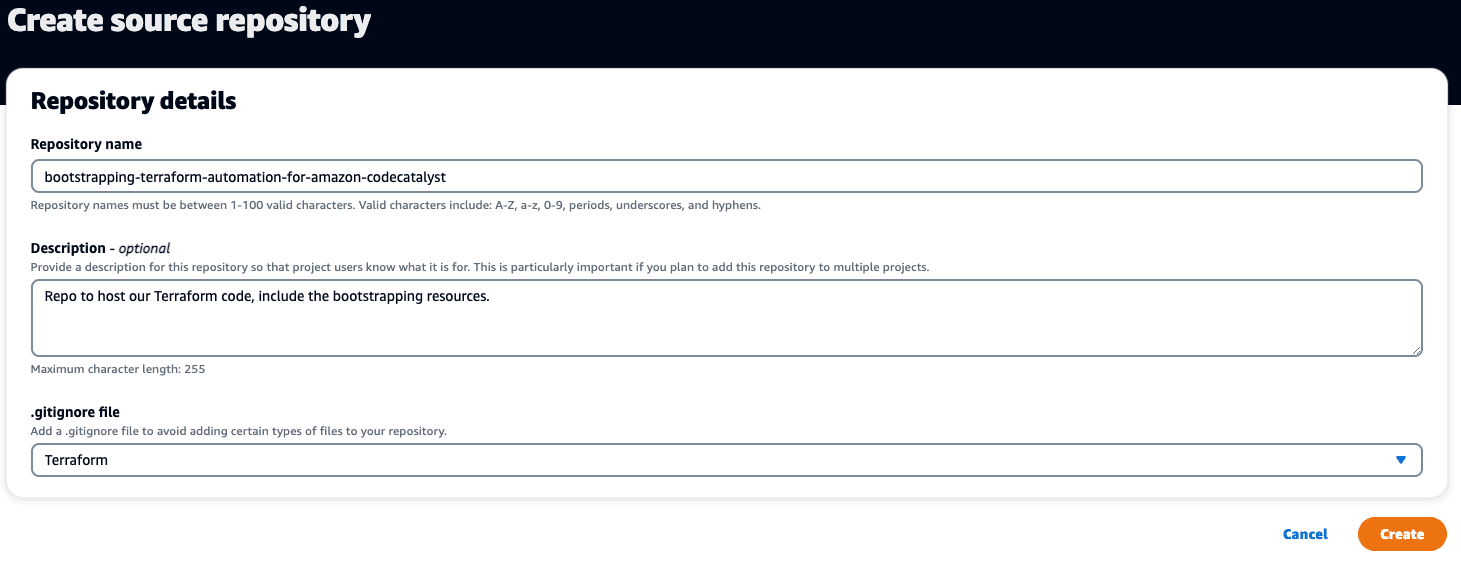
Lastly, we need to set up the AWS environment we will use for our workflow. In the left-side navigation menu, click on
CI/CD,then onEnvironments,and thenCreate environment.Add theEnvironment name,Description,choose your AWS account from the dropdown underAWS account connection,and clickCreate environment.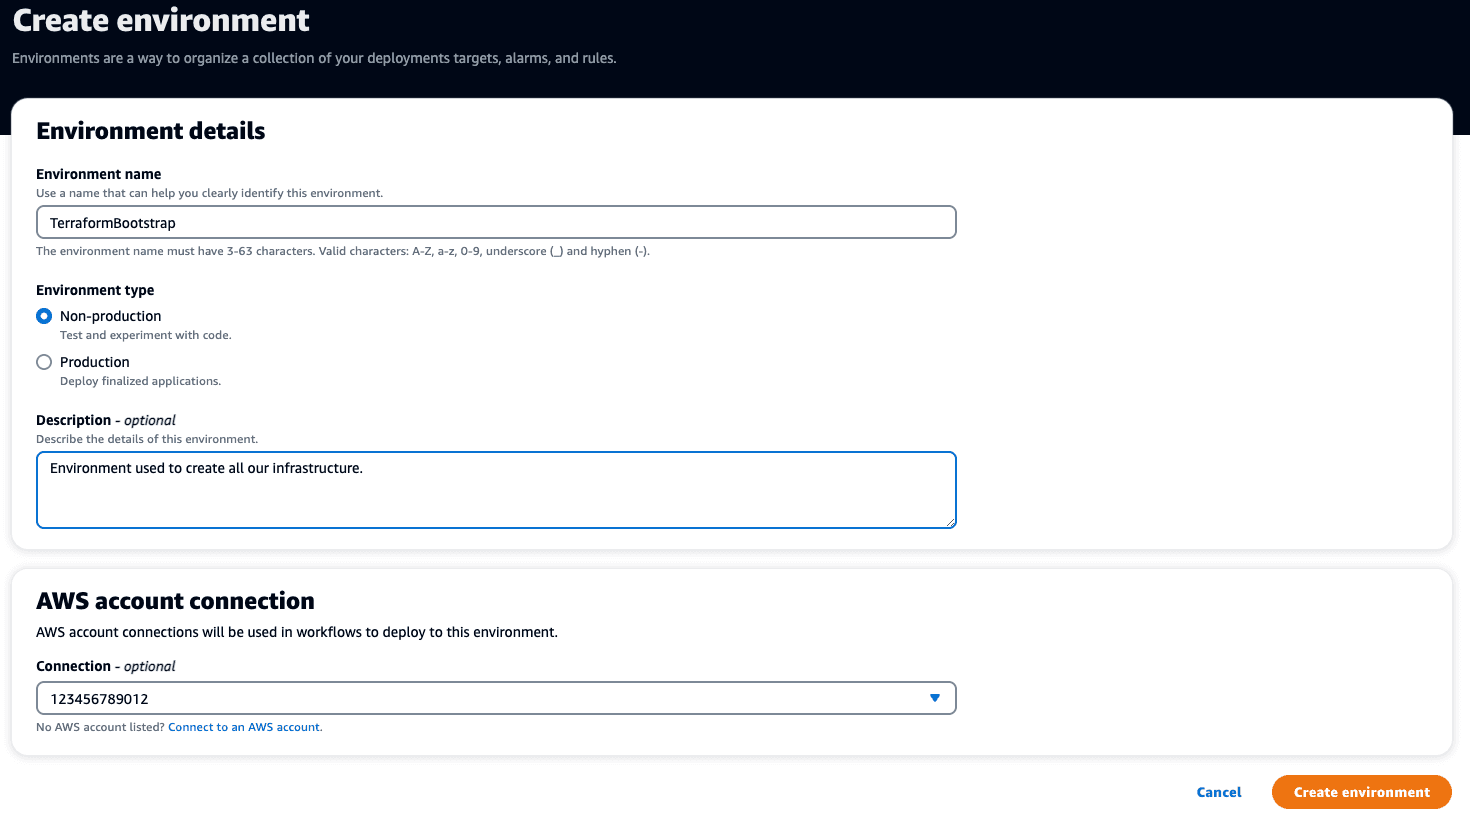
To start working on our code, we need to set up a development environment, and will be using the built-in ones provided by CodeCatalyst. In the left navigation menu, click on
Dev EnvironmentunderCode,thenCreate Dev Environment,selectCloud9- this tutorial with use Cloud9. SelectClone a repository,selectbootstrapping-terraform-automation-for-amazon-code-catalystin the dropdown forRepository,add anAliasofTerraformBootstrap,and then click theCreatebutton.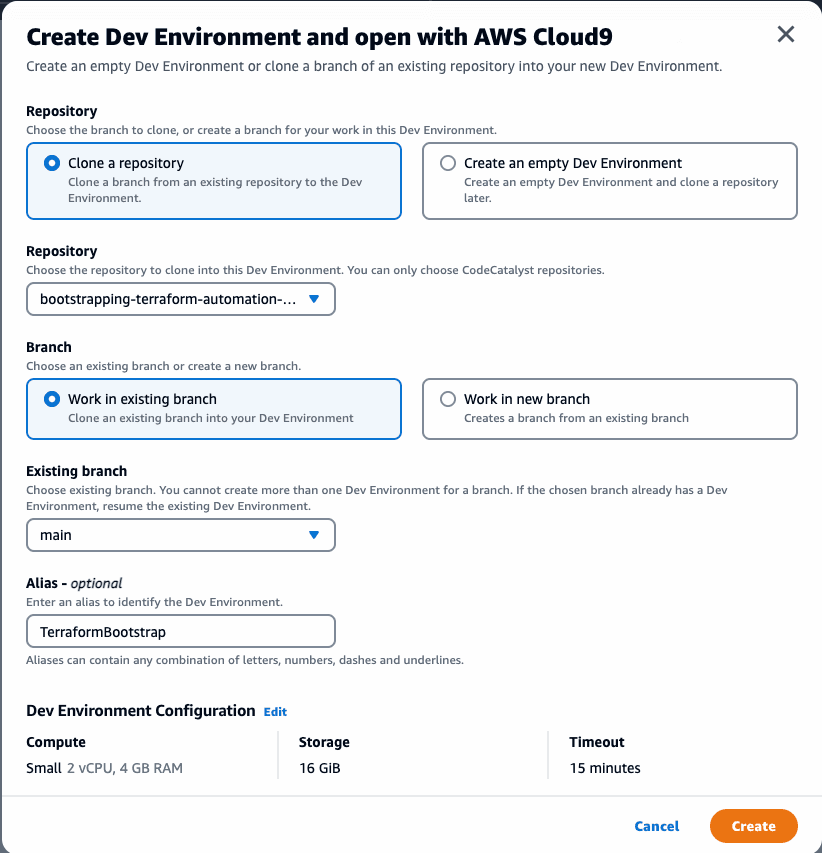
It will take 1 - 2 minutes to provision your development environment, and once done, you will be presented with a welcome screen:
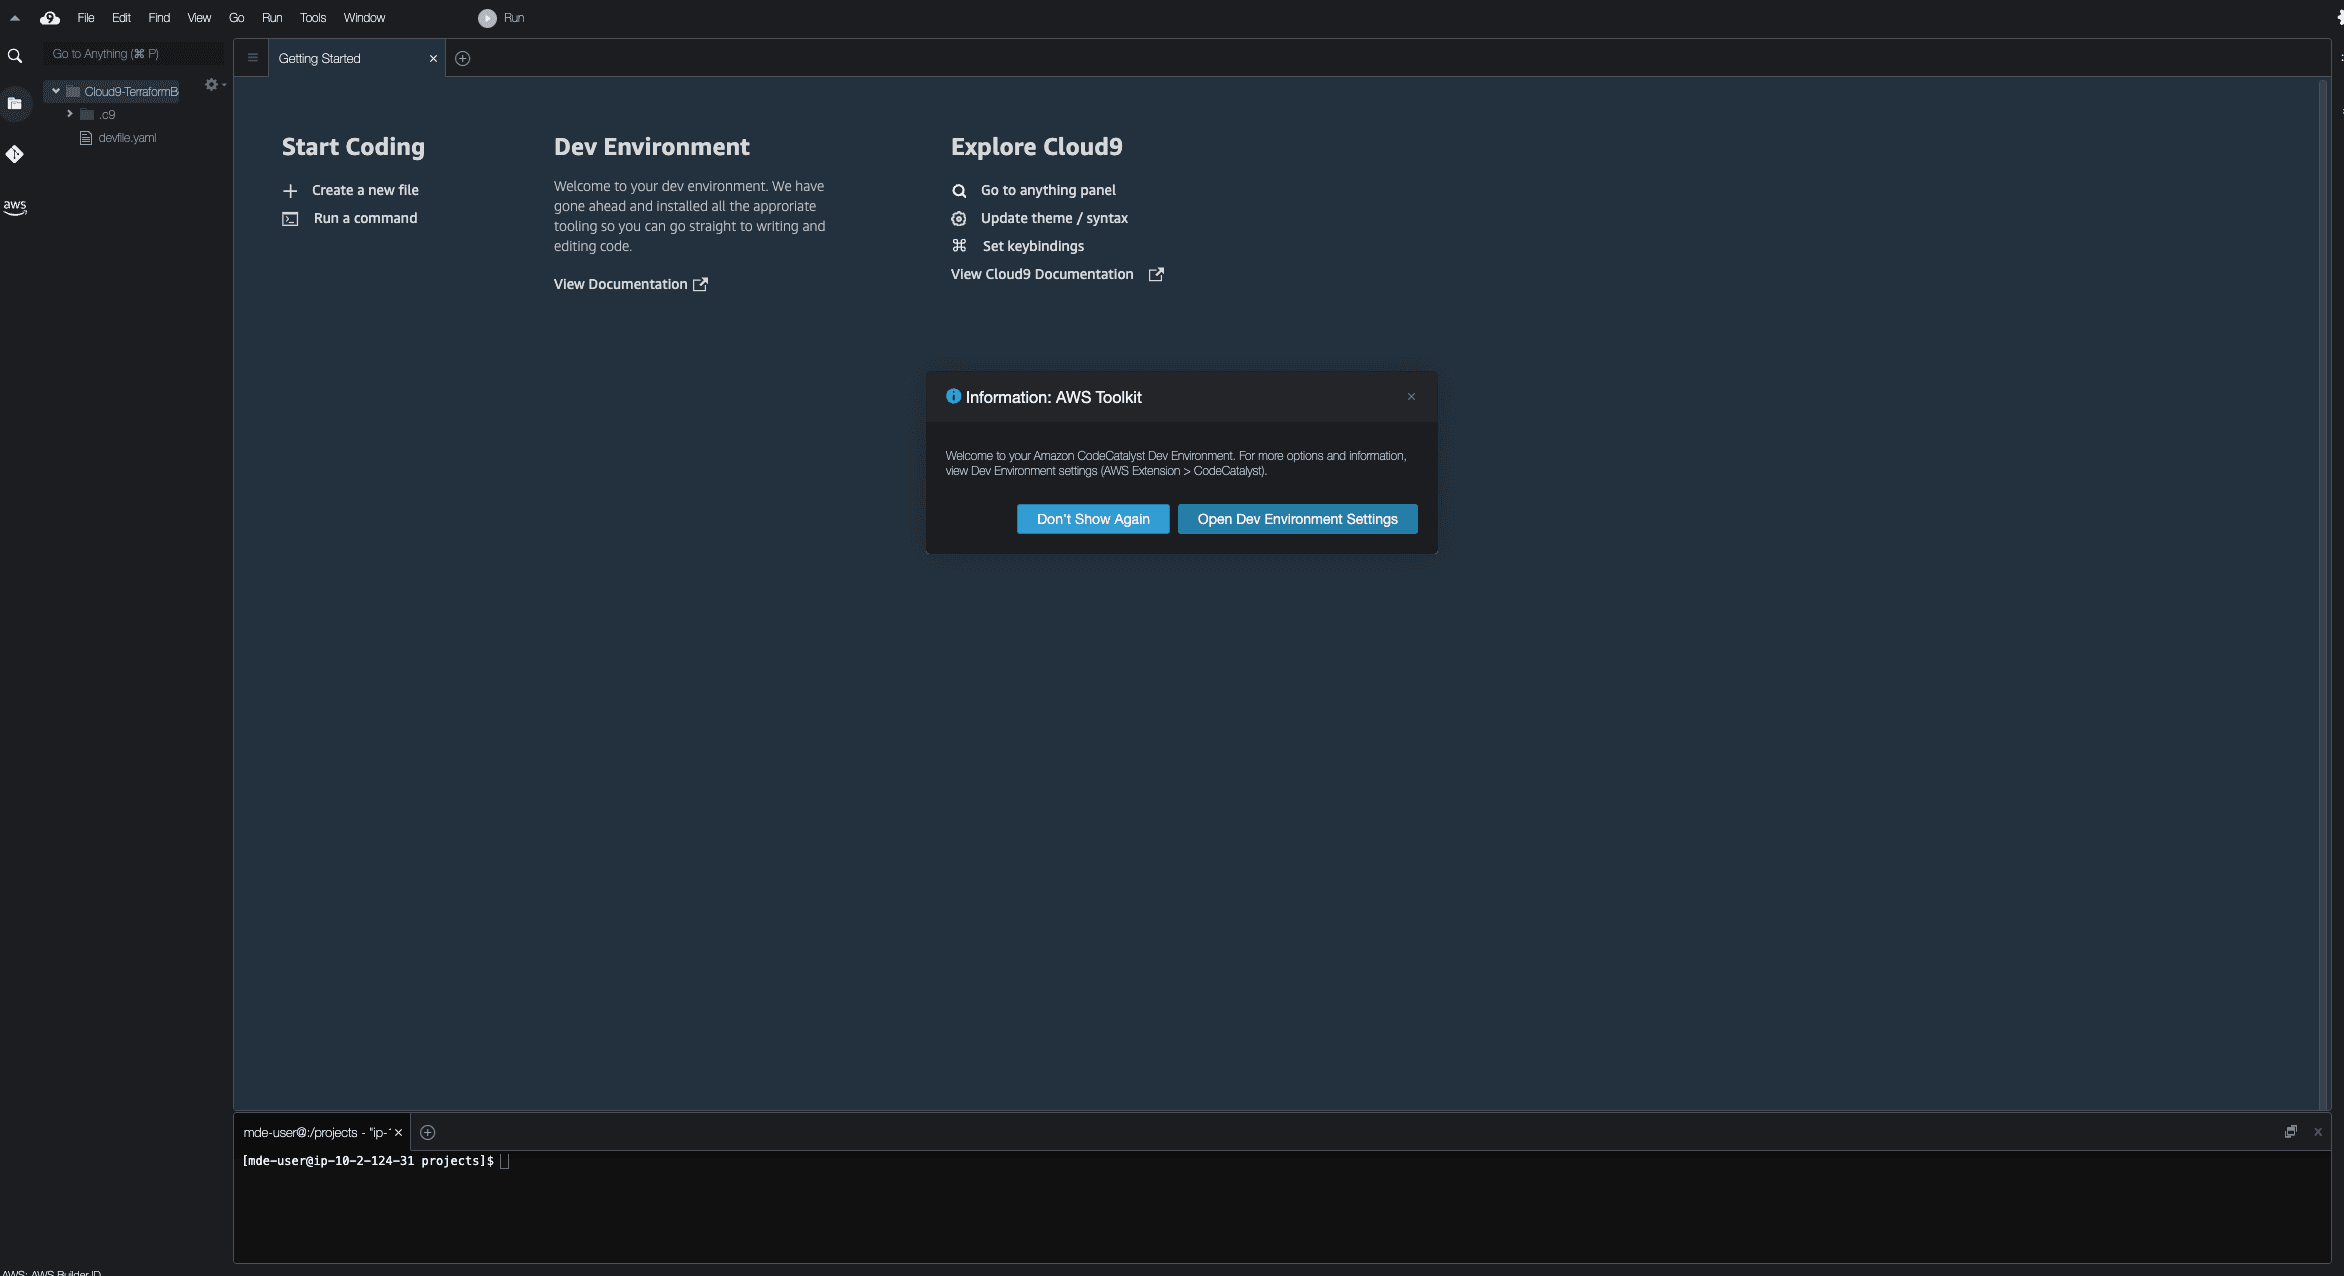
The version of Terraform may not be the latest, you can check which version is installed by running
terraform --version.This tutorial uses version 1.3.7, to ensure you are using that version, use the following commands:🚨 NB: If you are using a local development environment instead of one managed by CodeCatalyst, the architecture / operating system may be different, please see thedownloadspage to download the appropriate version of Terraform.
Lastly, we need to add AWS CLI credentials to our Dev Environment to access resource in our account. It is recommended to not use the root user, if you have not yet set up an IAM user, please do so now by following theinstructions,and make sure to copy the
Access key IDandSecret access keyvalues, then runaws configurein the terminal of your dev environment (you can leave the last two default values blank, or enter values you prefer):You can verify that access is set up correctly by running
aws sts get-caller-identityin the terminal:Next, we need to add the required infrastructure to our AWS account using Terraform. We will be creating the following resources:
- IAM roles:Provides the role for our workflow to assume in the account - one for the
mainbranch, one for any pull requests (PRs). - IAM policies:Set the boundaries of what the workflow IAM roles may do in our account - full admin access for
mainbranch allowing creation of infrastructure,ReadOnlyfor the PR branches to allow validating any changes. - S3 bucket:An S3 bucket to store our Terraform state file in.
- S3 bucket versioning:Allows keeping backup copies of the Terraform state file each time it changes.
- DynamoDB Table:Used by Terraform to create a lock while running - this prevents multiple CI jobs making changes when run in parallel.
- KMS Encryption Key:(Optional) While the state file is stored in S3, we want to encrypt it while at rest using a KMS key. For this tutorial, we will use the pre-existing
aws/s3key, if you prefer to use a different KMS key ($1/month/key), there will be a section below to describe how to make changes to do that.
To create all of the required files, you can use the following commands to create the directories, and download the files directly from the sample repository. Run the commands in the root of your cloned git repo via the dev environment terminal:
The files created will have the following content:
Once done, edit the
_bootstrap/variable.tffile and update thestate_file_bucket_name(S3 bucket names are globally unique), and optionally thestate_file_lock_table_namevariables with the values for your S3 bucket name for the state file, DynamoDB table name for locks, and optionally change theaws_regionif you want to use a different region.We will now bootstrap our infrastructure (the body of each Terraform resource from the
terraform plancommand has been omitted using...):The output should look like:
The
plancommand will output a list of resources to create, and you can take a look at exactly what it will create. Once you are satisfied, runterraform apply,and confirm the infrastructure creation.Next, we will move the state file we just created with all the details of our infrastructure to our S3 bucket. To do this, we need to configure a Terraformbackendusing S3. Create
_bootstrap/terraform.tfwith the following, and update thebucketandregionvalues with your values:It would be easier if we could reference
regionandstate_file_bucketvariables in the Terraform backend configuration, but itdoes not allowany variable / local interpolation.To migrate the state file to S3, run
terraform init -migrate-state,and you should see the following output:We are now ready to set up our workflows, but first, let's ensure we commit our changes to our git repo. Run
git add.,git commit -m "Terraform bootstrapped"andgit push:In the previous section, we created two new IAM roles for our workflow, one for the
mainbranch with permissions to create resources, and another for all pull requests with read-only permissions. We need to add these to our CodeCatalyst Space. In the top left of the page, click on the Space dropdown, and then click on your Space name. Navigate to theAWS accountstab, click your AWS account number, and then onManage roles from the AWS Management Console.This will open a new tab, selectAdd an existing role you have created in IAM,and selectMain-Branch-Infrastructurefrom the dropdown. ClickAdd role: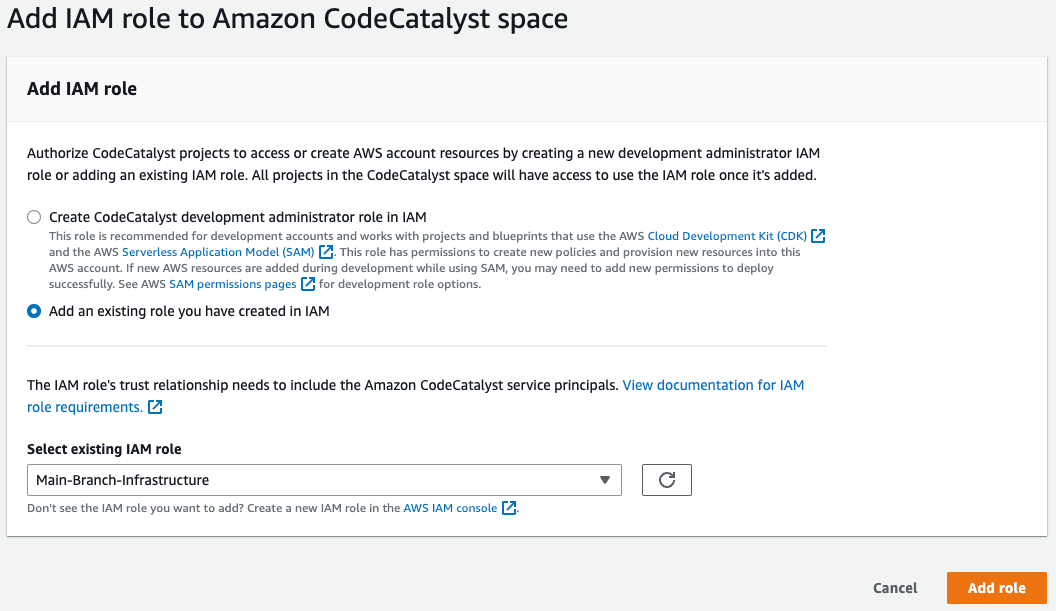
This will take you to a new page with a green
Successfully added IAM role Main-Branch-Infrastructure.banner at the top. Click onAdd IAM role,and follow the same process to add thePR-Branch-Infrastructurerole. Once done, you can close this window and go back to the CodeCatalyst one.The base infrastructure is now in place to allow us to start using our workflow for any future changes to our infrastructure. We need to create a similar Terraform backend configuration for all the resource we will create using our workflow - as mentioned, we are intentionally keeping out bootstrapping infrastructure separate from the day-to-day infrastructure. In the root of the repo, create
terraform.tf,with the following content - take note that thekeyfor the bucket is different from what we used for the bootstrapping infrastructure, and as before, replace thebucket,region,dynamodb_table,andkms_key_idwith your values:The
regionset in the above block indicates in which region the S3 bucket was created, not where we will create our resources. We also need to configure theAWSprovider, and set theregionto use. Will use a variable for this, you could also hard-code it, but it is more manageable to keep all the variables in a singlevariables.tffile for this purpose. Createproviders.tfwith the following content:And the
variables.tffile with (you can change the region here if you want to create resources in a different one):Now we are ready to create our workflow file. First, we need to create the workflow directory and file:
Open
.codecatalyst/workflows/main_branch.ymlin your IDE, and add the following - remember to replace the placeholder AWS account ID111122223333with the value of your account, and the IAM role names if you changed them (you can choose between the standard CodeCatalyst workflow, or to use GitHub Actions with CodeCatalyst):Let's try out our new workflow! First, we need to stage, commit, and push our changes directly to the
mainbranch - this is needed as only workflows committed to the repo will be run by CodeCatalyst. Use the following commands:Output:
In your browser, navigate to the
CI/CD->Workflowspage. You should see the workflow running: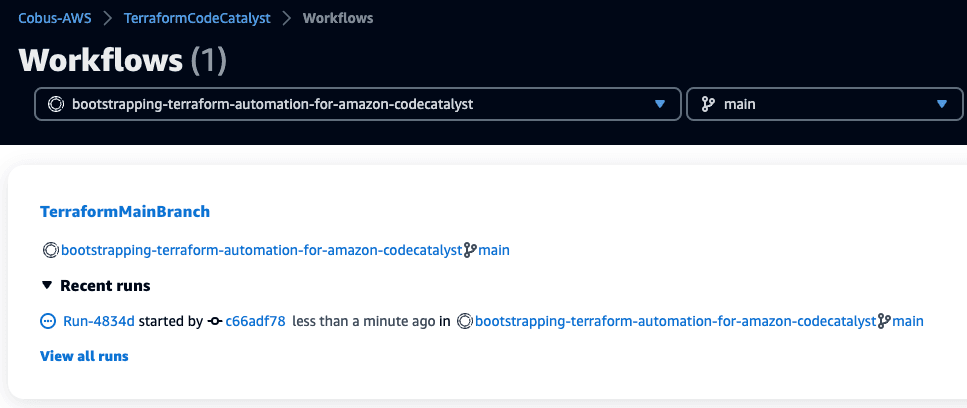
If you click on
Recent runsto expand it, you will see the details of the currently running job. Click on the job ID (Run-XXXXX) to view the different stages of the build: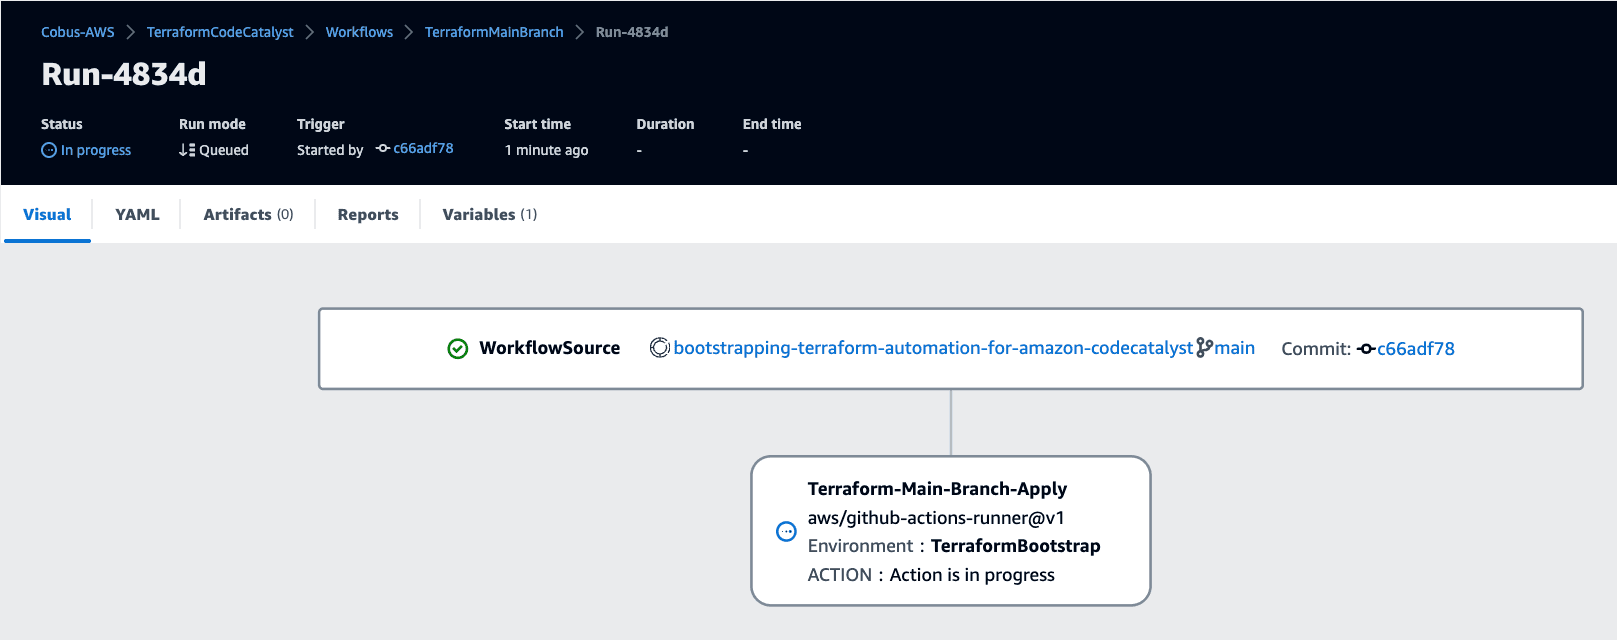
Now that we have our
mainbranch workflow done, it is time to set up the pull request one. The workflow will be very similar as themainbranch one, with the following difference:- A different workflow name -
TerraformPRBranch - We use the
PR-Branch-InfrastructureIAM role to ensure we cannot make any infrastructure changes in the PR workflow - We remove the
terraform applystep - The trigger for the build is for when a PR to the
mainbranch is opened or updated (REVISION)
Create a new file for the PR workflow as
.codecatalyst/workflows/pr_branch.yml,and add the following (replacing the placeholder AWS account ID of111122223333,and the IAM role name if you changed it) - you can choose between the standard CodeCatalyst workflow, or to use GitHub Actions with CodeCatalyst:This workflow needs to be added to the
mainbranch before it will trigger for a new PR, so let's do that now:This will trigger the
mainbranch workflow as we added a change, but without adding any additional Terraform resources, it will not make any changes: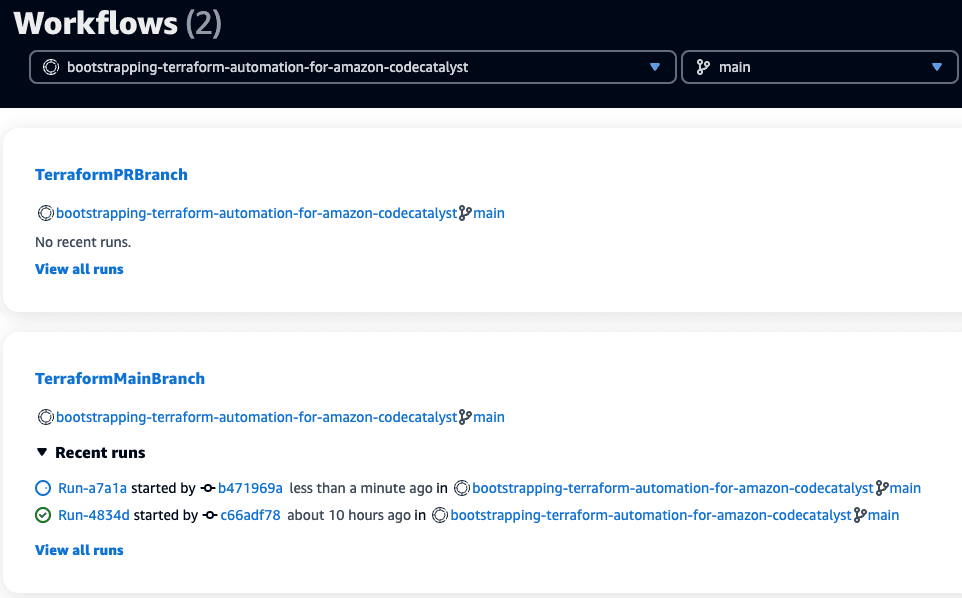
We will now add an AWS resource via Terraform via a PR. First, we need to create a new branch:
Next, create a new file in the root of the project
vpc.tf- we will create a VPC that has three public subnets, and the required routing tables. Add the following content to the file:We need to commit the change, and push the branch using
--set-upstream origin test-pr-workflowas the remote branch does not yet exist:The output shows that the remote branch has been created, and we pushed changes from our local branch to that one:
This will not yet trigger a PR branch workflow as we haven't opened the pull request. In CodeCatalyst, navigate to
Code,thenPull requests,and click onCreate pull request.Selecttest-pr-workflowas theSource branch,mainas theDestination branch,and add in aPull request titleandPull request description.You can also preview the changes the PR will make on the bottom of the screen: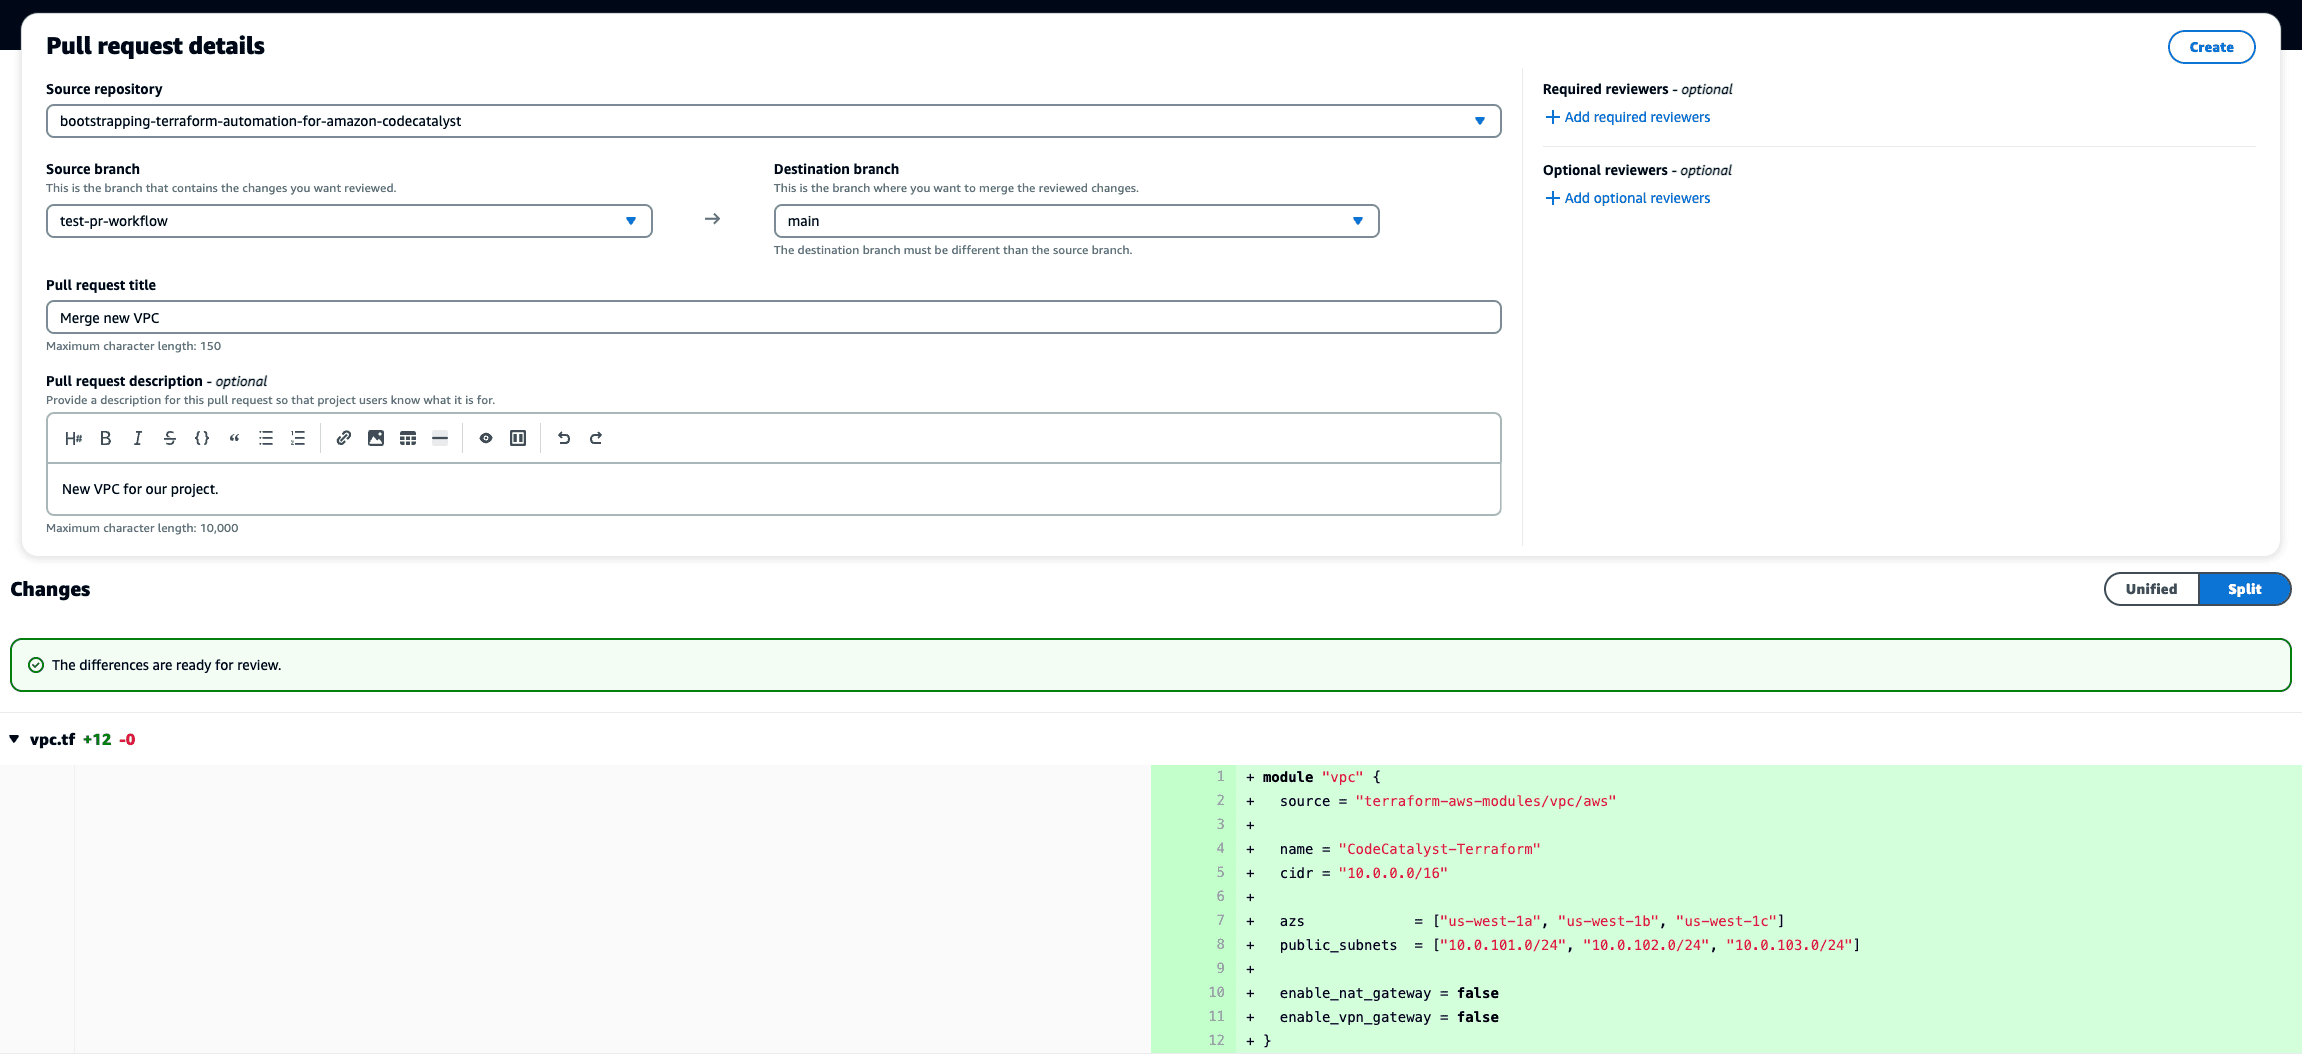
Click
Create,and then navigate toCI/CD->Workflows,and selectAll branchesfrom the dropdown in the top of theWorkflowsmenu. After selectingAll branches,you will see four workflows, theTerraformMainBranchandTerraformPRBranchones, and a copy for each of the two branchesmainandtest-pr-workflow.TheTerraformMainBranchworkflow will have an error withWorkflow is inactive,which is expected as we limit that workflow to only run on our main branch. Click on theRecent runsunder theTerraformPRBranchworkflow for thetest-pr-workflowbranch, and then onTerraform-PR-Branch-Planjob to see the details.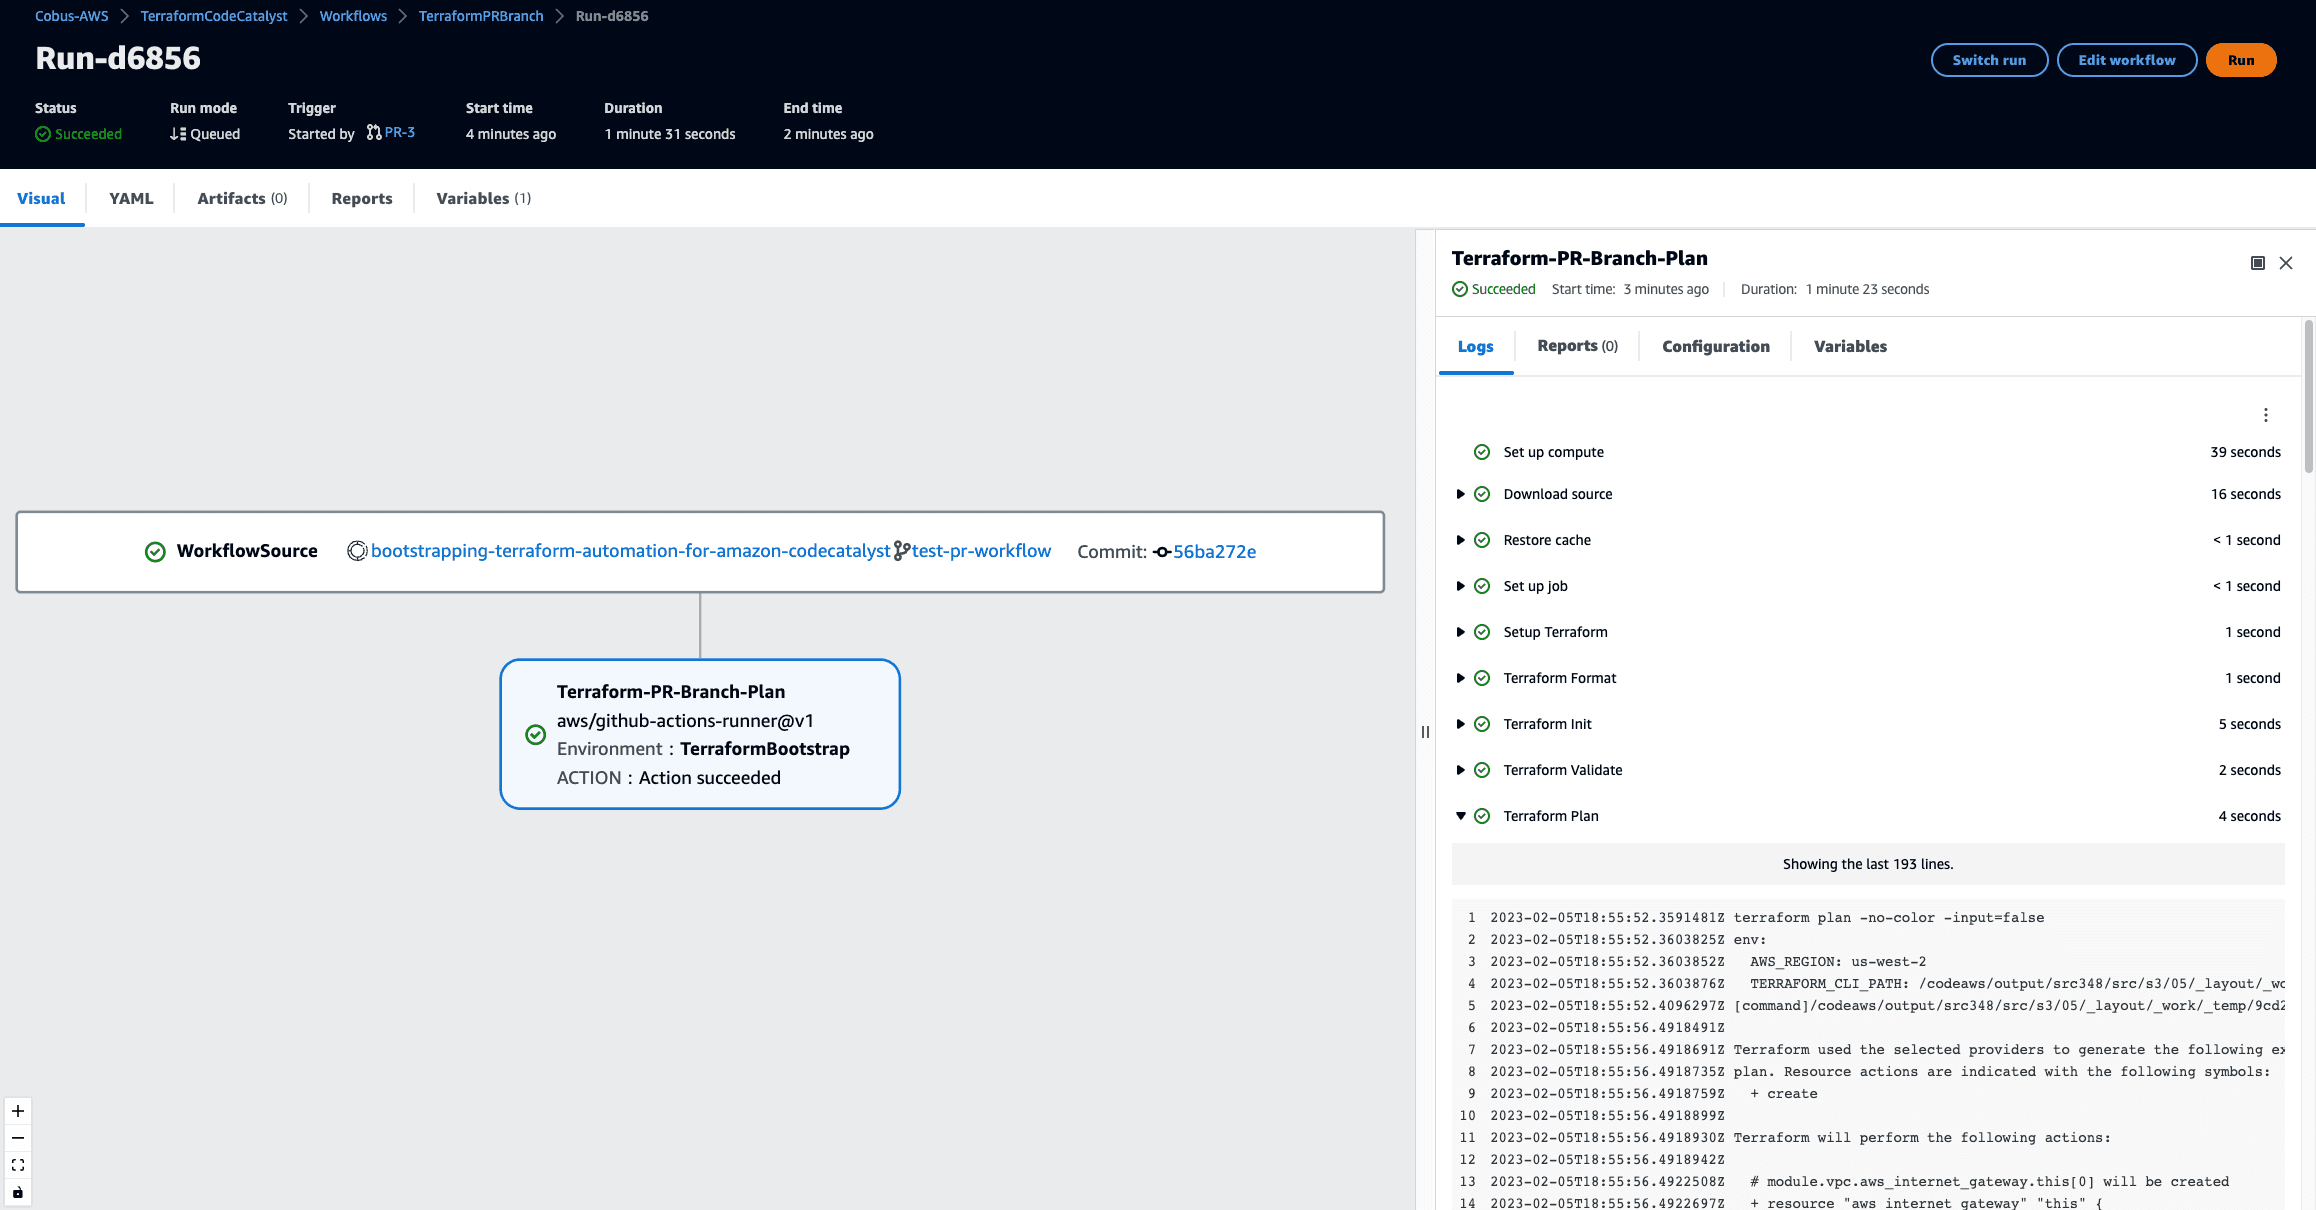
By clicking on the
Terraform Planstep, you will be able to see the proposed infrastructure changes listed in the output. You can now inspect exactly which changes will be made to your infrastructure from this pull request. In you standard day-to-day operations, you would now go back to pull request to decide what action to take. If the proposed changes have been reviewed and approved, you can merge the pull request, or you can start a conversation on the PR to address any issues or concerns. We will now merge this request to roll out this infrastructure in our account by navigating toCode->Pull requests,clicking on theTitleorIDof the PR, and then theMergebutton. You are presented with a choice between aFast forward merge,or aSquash and mergeoption.Fast forward mergewill take all the commits on the branch and add them sequentially to themainbranch as if they were done there. For theSquash merge,it will combine all the commits on thetest-pr-workflowbranch into a single commit before merging that single commit tomain.Which one you use will depend on your development approach, for this tutorial, will use theFast forward mergeone. You can also select the option toDelete the source branch after merging this pill request. Source branch: test-pr-workflow,this will help keep your repository clean from too many branches if they are no longer used. Click onMerge,and navigate toCI/CD->Workflowsto see the new VPC being created. Click on the currently runningTerraformMainBranchworkflow'sRecent runs,then on the job ID, and then on the 2nd step to see the progress in the right-hand pane. Once the job completes, we can verify that the VPC was created by navigating to theVPC section of the AWS Console,a clicking on theVPC IDfor the VPC with the nameCodeCatalyst-Terraform.You should see something similar: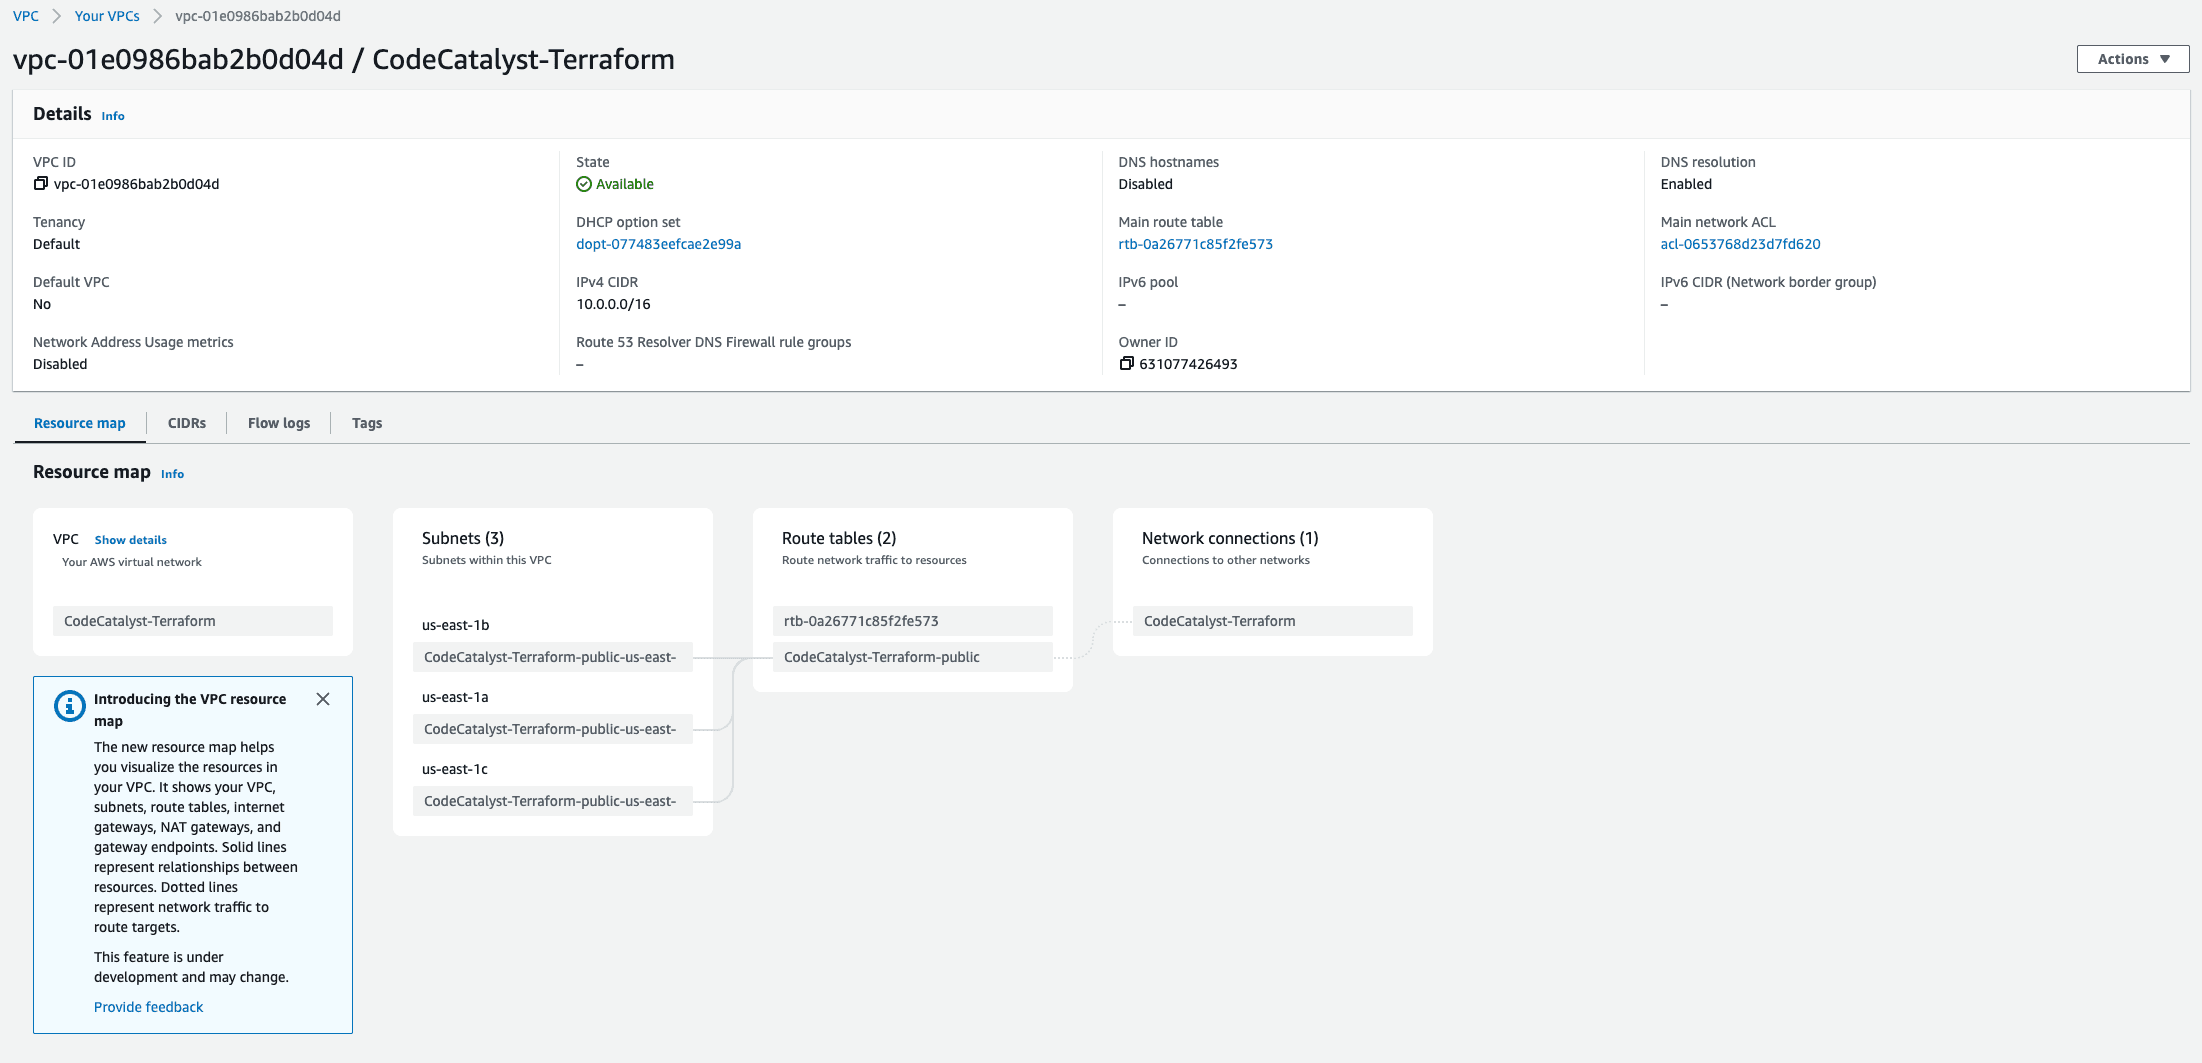
We have now reached the end of this tutorial, you can either keep the current setup and expand on it, or delete all the resources created if you are not. If you are planning to manage multiple AWS accounts, we recommend reading theAutomating multiple environments with Terraformtutorial - it follows directly from this one, and you can leave the resources created in place.
To remove all the resources we created in this project, follow the following steps in your dev environment:
- Make sure you are on the
mainbranch by runninggit checkout mainandgit pullto ensure you have the latest changes, then runterraform destroy,and typeyesto confirm - this will remove the VPC we created - To delete all the bootstrapping resourced, first change into the directory by running
cd _bootstrap.Before we can delete everything, we need to update our S3 state file bucket. We need to change the lifecycle policy to allow the deletion, and addforce_destroy = trueto also delete all the objects in the bucket. Edit_bootstrap/state_file_resources.tf,and replace the firstaws_s3_bucketresource with: - Run
terraform apply,and accept the changes. - Now run
terraform destroy,and accept the changes. This will result in two errors since we are deleting the S3 bucket where it tries to store the updated state file, and also the DynamoDB table Terraform uses to store the lock to prevent parallel runs. The output will look similar to this: - Lastly, we need to delete the project we created in CodeCatalyst. In the left-hand navigation, go to
Project settings,click onDelete project,and follow the instructions to delete the project.
Congratulations! You've now bootstrapped Terraform with CodeCatalyst, and can deploy any infrastructure changes using a pull request workflow. If you enjoyed this tutorial, found an issues, or have feedback for us,please send it our way!
Any opinions in this post are those of the individual author and may not reflect the opinions of AWS.
