Develop code in Databricks notebooks
This page describes how to develop code in Databricks notebooks, including autocomplete, automatic formatting for Python and SQL, combining Python and SQL in a notebook, and tracking the notebook version history.
For more details about advanced functionality available with the editor, such as autocomplete, variable selection, multi-cursor support, and side-by-side diffs, seeUse the Databricks notebook and file editor.
When you use the notebook or the file editor, Databricks Assistant is available to help you generate, explain, and debug code. SeeUse Databricks Assistantfor more information.
Databricks notebooks also include a built-in interactive debugger for Python notebooks. SeeUse the Databricks interactive debugger.
Get coding help from Databricks Assistant
Databricks Assistant is a context-aware AI assistant that you can interact with using a conversational interface, making you more productive inside Databricks. You can describe your task in English and let the assistant generate Python code or SQL queries, explain complex code, and automatically fix errors. The assistant uses Unity Catalog metadata to understand your tables, columns, descriptions, and popular data assets across your company to provide personalized responses.
Databricks Assistant can help you with the following tasks:
- Generate code.
- Debug code, including identifying and suggesting fixes for errors.
- Transform and optimize code.
- Explain code.
- Help you find relevant information in the Azure Databricks documentation.
For information about using Databricks Assistant to help you code more efficiently, seeUse Databricks Assistant.For general information about Databricks Assistant, seeDatabricksIQ-powered features.
Access notebook for editing
To open a notebook, use the workspaceSearch functionor use the workspace browser tonavigate to the notebookand click on the notebook’s name or icon.
Browse data
Use the schema browser to explore Unity Catalog objects available for the notebook. Click![]() at the left side of the notebook to open the schema browser.
at the left side of the notebook to open the schema browser.
TheFor youbutton displays only those objects that you’ve used in the current session or previously marked as a Favorite.
As you type text into theFilterbox, the display changes to show only those objects that contain the text you type. Only objects that are currently open or have been opened in the current session appear. TheFilterbox does not do a complete search of the catalogs, schemas, tables, and volumes available for the notebook.
To open the![]() kebab menu, hover the cursor over the object’s name as shown:
kebab menu, hover the cursor over the object’s name as shown:

If the object is a table, you can do the following:
- Automatically create and run a cell to display a preview of the data in the table. SelectPreview in a new cellfrom the kebab menu for the table.
- View a catalog, schema, or table in Catalog Explorer. SelectOpen in Catalog Explorerfrom the kebab menu. A new tab opens showing the selected object.
- Get the path to a catalog, schema, or table. SelectCopy… pathfrom the kebab menu for the object.
- Add a table to Favorites. SelectAdd to favoritesfrom the kebab menu for the table.
If the object is a catalog, schema, or volume, you can copy the object’s path or open it in Catalog Explorer.
To insert a table or column name directly into a cell:
- Click your cursor in the cell at the location you want to enter the name.
- Move your cursor over the table name or column name in the schema browser.
- Click the double arrow
 that appears at the right of the object’s name.
Keyboard shortcuts
To display keyboard shortcuts, selectHelp > Keyboard shortcuts.The keyboard shortcuts available depend on whether the cursor is in a code cell (edit mode) or not (command mode).
Command palette
You can quickly perform actions in the notebook using the command palette. To open a panel of notebook actions, click at the lower-right corner of the workspace or use the shortcutCmd + Shift + Pon MacOS orCtrl + Shift + Pon Windows.

Find and replace text
To find and replace text within a notebook, selectEdit > Find and Replace.The current match is highlighted in orange and all other matches are highlighted in yellow.
To replace the current match, clickReplace.To replace all matches in the notebook, clickReplace All.
To move between matches, click thePrevandNextbuttons. You can also press shift+enterandenterto go to the previous and next matches, respectively.
To close the find and replace tool, click![]() or pressesc.
or pressesc.
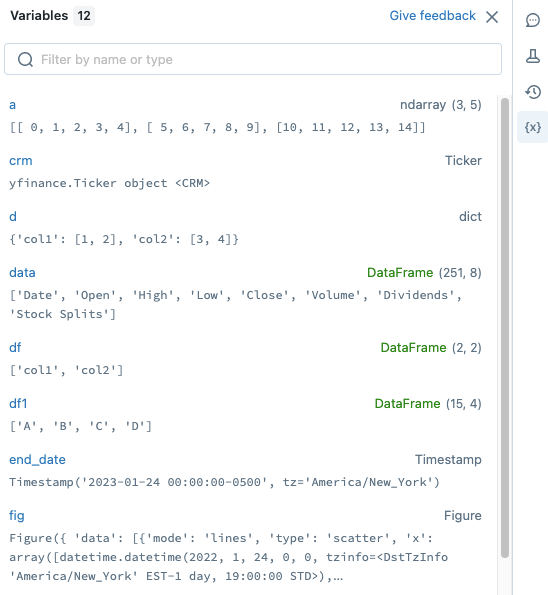
Variable explorer
You can directly observe Python, Scala, and R variables in the notebook UI. For Python on Databricks Runtime 12.2 LTS and above, the variables update as a cell runs. For Scala, R, and for Python on Databricks Runtime 11.3 LTS and below, variables update after a cell finishes running.
To open the variable explorer, click![]() inthe right sidebar.The variable explorer opens, showing the value and data type, including shape, for each variable that is currently defined in the notebook. (The shape of a PySpark dataframe is ‘?’, because calculating the shape can be computationally expensive.)
inthe right sidebar.The variable explorer opens, showing the value and data type, including shape, for each variable that is currently defined in the notebook. (The shape of a PySpark dataframe is ‘?’, because calculating the shape can be computationally expensive.)
To filter the display, enter text into the search box. The list is automatically filtered as you type.
Variable values are automatically updated as you run notebook cells.
Run selected cells
You can run a single cell or a collection of cells. To select a single cell, click anywhere in the cell. To select multiple cells, hold down theCommandkey on MacOS or theCtrlkey on Windows, and click in the cell outside of the text area as shown in the screen shot.
To run the selected The behavior of this command depends on the cluster that the notebook is attached to.
- On a cluster running Databricks Runtime 13.3 LTS or below, selected cells are executed individually. If an error occurs in a cell, the execution continues with subsequent cells.
- On a cluster running Databricks Runtime 14.0 or above, or on a SQL warehouse, selected cells are executed as a batch. Any error halts execution, and you cannot cancel the execution of individual cells. You can use theInterruptbutton to stop execution of all cells.
Modularize your code
Important
This feature is inPublic Preview.
With Databricks Runtime 11.3 LTS and above, you can create and manage source code files in the Azure Databricks workspace, and then import these files into your notebooks as needed.
For more information on working with source code files, seeShare code between Databricks notebooksandWork with Python and R modules.
Run selected text
You can highlight code or SQL statements in a notebook cell and run only that selection. This is useful when you want to quickly iterate on code and queries.
Highlight the lines you want to run.
SelectRun > Run selected textor use the keyboard shortcut
Ctrl+Shift+Enter.If no text is highlighted,Run Selected Textexecutes the current line.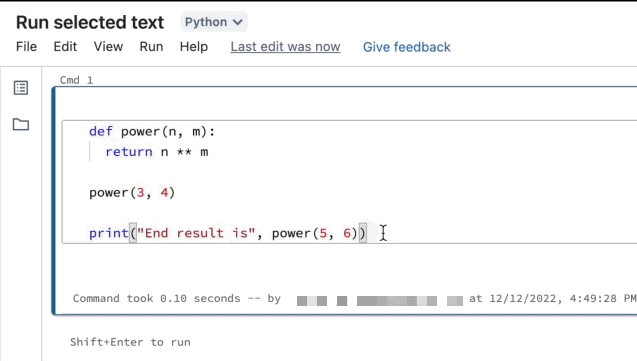
If you are usingmixed languages in a cell,you must include the%<language>line in the selection.
Run selected textalso executes collapsed code, if there is any in the highlighted selection.
Special cell commands such as%run,%pip,and%share supported.
You cannot useRun selected texton cells that have multiple output tabs (that is, cells where you have defined a data profile or visualization).
Format code cells
Azure Databricks provides tools that allow you to format Python and SQL code in notebook cells quickly and easily. These tools reduce the effort to keep your code formatted and help to enforce the same coding standards across your notebooks.
Python black formatter library
Important
This feature is inPublic Preview.
Azure Databricks supports Python code formatting usingblackwithin the notebook. The notebook must be attached to a cluster withblackandtokenize-rtPython packages installed.
On Databricks Runtime 11.3 LTS and above, Azure Databricks preinstallsblackandtokenize-rt.You can use the formatter directly without needing to install these libraries.
On Databricks Runtime 10.4 LTS and below, you must installblack==22.3.0andtokenize-rt==4.2.1from PyPI on your notebook or cluster to use the Python formatter. You can run the following command in your notebook:
%pip install black==22.3.0 tokenize-rt==4.2.1
orinstall the library on your cluster.
For more details about installing libraries, seePython environment management.
For files and notebooks in Databricks Git folders, you can configure the Python formatter based on thepyproject.tomlfile. To use this feature, create apyproject.tomlfile in the Git folder root directory and configure it according to theBlack configuration format.Edit the [tool.black] section in the file. The configuration is applied when you format any file and notebook in that Git folder.
How to format Python and SQL cells
You must haveCAN EDIT permissionon the notebook to format code.
Azure Databricks uses theGethue/sql-formatterlibrary to format SQL and theblackcode formatter for Python.
You can trigger the formatter in the following ways:
Format a single cell
- Keyboard shortcut: PressCmd+Shift+F.
- Command context menu:
- Format SQL cell: SelectFormat SQLin the command context dropdown menu of a SQL cell. This menu item is visible only in SQL notebook cells or those with a
%sqllanguage magic. - Format Python cell: SelectFormat Pythonin the command context dropdown menu of a Python cell. This menu item is visible only in Python notebook cells or those with a
% Pythonlanguage magic.
- Format SQL cell: SelectFormat SQLin the command context dropdown menu of a SQL cell. This menu item is visible only in SQL notebook cells or those with a
- NotebookEditmenu: Select a Python or SQL cell, and then selectEdit > Format Cell(s).
Format multiple cells
Select multiple cellsand then selectEdit > Format Cell(s).If you select cells of more than one language, only SQL and Python cells are formatted. This includes those that use
%sqland% Python.Format all Python and SQL cells in the notebook
SelectEdit > Format Notebook.If your notebook contains more than one language, only SQL and Python cells are formatted. This includes those that use
%sqland% Python.
Limitations of code formatting
- Black enforcesPEP 8standards for 4-space indentation. Indentation is not configurable.
- Formatting embedded Python strings inside a SQL UDF is not supported. Similarly, formatting SQL strings inside a Python UDF is not supported.
Version history
Azure Databricks notebooks maintain a history of notebook versions, allowing you to view and restore previous snapshots of the notebook. You can perform the following actions on versions: add comments, restore and delete versions, and clear version history.
You can alsosync your work in Databricks with a remote Git repository.
To access notebook versions, click in the right sidebar. The notebook version history appears. You can also selectFile > Version history.
Add a comment
To add a comment to the latest version:
Click the version.
ClickSave now.
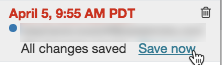
In the Save Notebook Version dialog, enter a comment.
ClickSave.The notebook version is saved with the entered comment.
Restore a version
To restore a version:
Click the version.
ClickRestore this version.
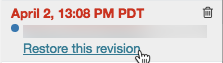
ClickConfirm.The selected version becomes the latest version of the notebook.
Delete a version
To delete a version entry:
Click the version.
Click the trash icon
 .
.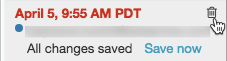
ClickYes, erase.The selected version is deleted from the history.
Clear version history
The version history cannot be recovered after it has been cleared.
To clear the version history for a notebook:
- SelectFile > Clear version history.
- ClickYes, clear.The notebook version history is cleared.
Code languages in notebooks
Set default language
The default language for the notebook appears next to the notebook name.

To change the default language, click the language button and select the new language from the dropdown menu. To ensure that existing commands continue to work, commands of the previous default language are automatically prefixed with a language magic command.
Mix languages
By default, cells use the default language of the notebook. You can override the default language in a cell by clicking the language button and selecting a language from the dropdown menu.
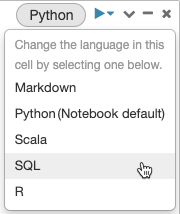
Alternately, you can use the language magic command%<language>at the beginning of a cell. The supported magic commands are:% Python,%r,%scala,and%sql.
Note
When you invoke a language magic command, the command is dispatched to the REPL in theexecution contextfor the notebook. Variables defined in one language (and hence in the REPL for that language) are not available in the REPL of another language. REPLs can share state only through external resources such as files in DBFS or objects in object storage.
Notebooks also support a few auxiliary magic commands:
%sh:Allows you to run shell code in your notebook. To fail the cell if the shell command has a non-zero exit status, add the-eoption. This command runs only on the Apache Spark driver, and not the workers. To run a shell command on all nodes, use aninit script.%fs:Allows you to usedbutilsfilesystem commands. For example, to run thedbutils.fs.lscommand to list files, you can specify%fs lsinstead. For more information, seeWork with files on Azure Databricks.%md:Allows you to include various types of documentation, including text, images, and mathematical formulas and equations. See the next section.
SQL syntax highlighting and autocomplete in Python commands
Syntax highlighting and SQLautocompleteare available when you use SQL inside a Python command, such as in aspark.sqlcommand.
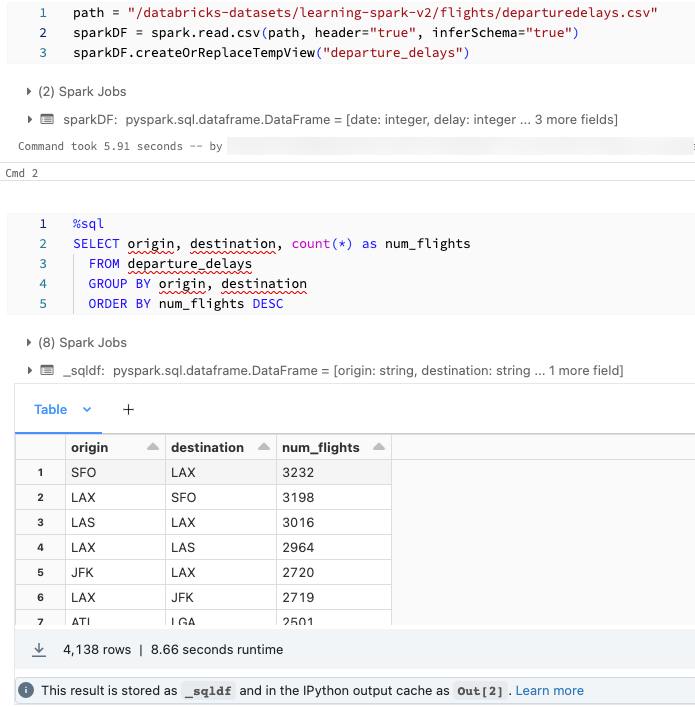
Explore SQL cell results in Python notebooks using Python
You might want to load data using SQL and explore it using Python. In a Databricks Python notebook, table results from a SQL language cell are automatically made available as a Python DataFrame assigned to the variable_sqldf.
In Databricks Runtime 13.3 LTS and above, you can also access the DataFrame result usingIPython’s output caching system.The prompt counter appears in the output message displayed at the bottom of the cell results. For the example shown, you would reference the result asOut[2].
Note
The variable
_sqldfmay be reassigned each time a%sqlcell is run. To avoid losing reference to the DataFrame result, assign it to a new variable name before you run the next%sqlcell:new_dataframe_name = _sqldfIf the query uses awidgetfor parameterization, the results are not available as a Python DataFrame.
If the query uses the keywords
CACHE TABLEorUNCACHE TABLE,the results are not available as a Python DataFrame.
The screenshot shows an example:
Execute SQL cells in parallel
While a command is running and your notebook is attached to an interactive cluster, you can run a SQL cell simultaneously with the current command. The SQL cell is executed in a new, parallel session.
To execute a cell in parallel:
ClickRun Now.The cell is immediately executed.
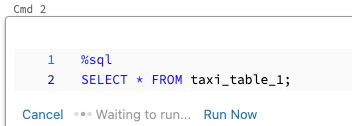
Because the cell is run in a new session, temporary views, UDFs, and theimplicit Python DataFrame(_sqldf) are not supported for cells that are executed in parallel. In addition, the default catalog and database names are used during parallel execution. If your code refers to a table in a different catalog or database, you must specify the table name using three-level namespace (catalog.schema.table).
Execute SQL cells on a SQL warehouse
You can run SQL commands in a Databricks notebook on aSQL warehouse,a type of compute that is optimized for SQL analytics. SeeUse a notebook with a SQL warehouse.
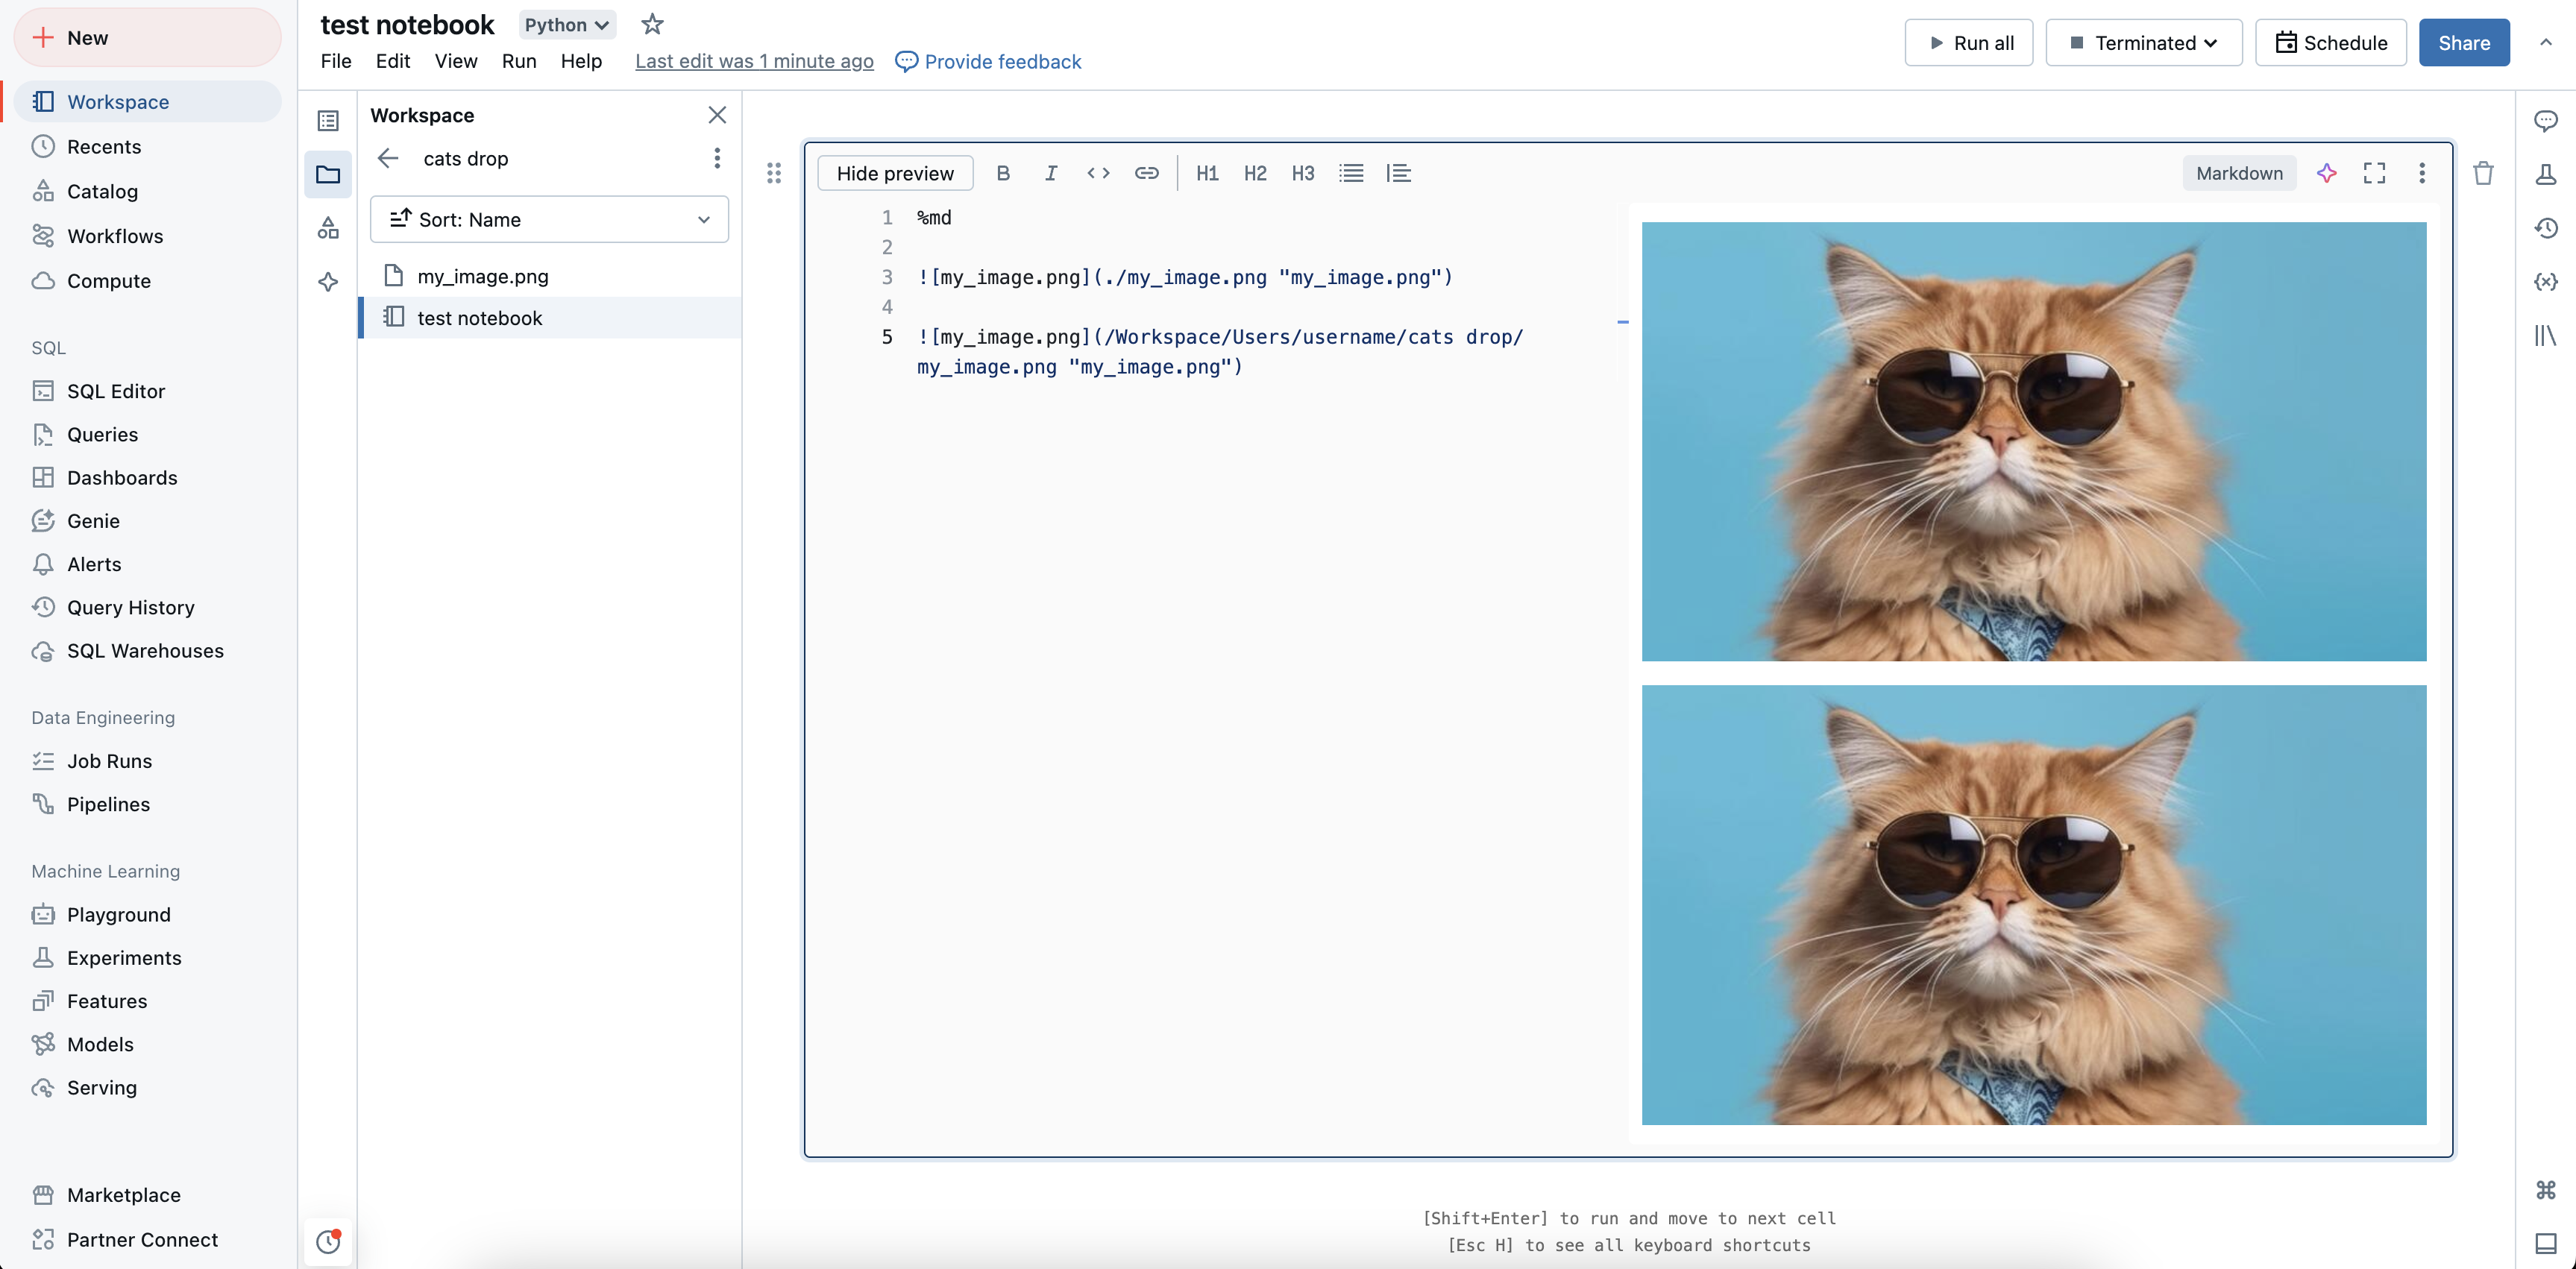
Display images
Azure Databricks supports the display of images in Markdown cells. You can display images stored in the Workspace, Volumes, or FileStore.
Display images stored in the Workspace
You can use either absolute paths or relative paths to display images stored in the Workspace. To display an image stored in the Workspace, use the following syntax:
%md


Display images stored in Volumes
You can use absolute paths to display images stored in Volumes. To display an image stored in Volumes, use the following syntax:
%md

Display images stored in the FileStore
To display images stored in theFileStore,use the following syntax:
%md

For example, suppose you have the Databricks logo image file in FileStore:
dbfs ls dbfs:/FileStore/
databricks-logo-mobile.png
When you include the following code in a Markdown cell:

the image is rendered in the cell:
Drag and drop images
You can drag and drop images from your local file system into Markdown cells. The image is uploaded to the current Workspace directory and displayed in the cell.
Display mathematical equations
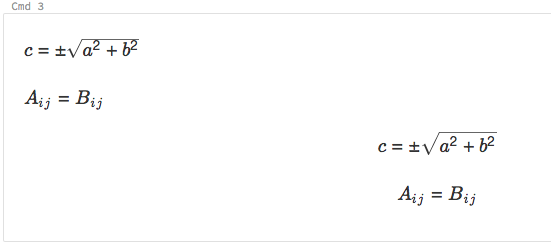
Notebooks supportKaTeXfor displaying mathematical formulas and equations. For example,
%md
\\(c = \\pm\\sqrt{a^2 + b^2} \\)

\\(A{_i}{_j}=B{_i}{_j}\\)

$$c = \\pm\\sqrt{a^2 + b^2}$$

\\[A{_i}{_j}=B{_i}{_j}\\]
renders as:
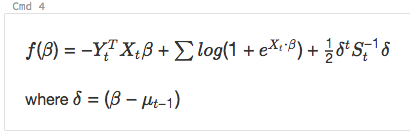
and
%md
\\( f(\beta)= -Y_t^T X_t \beta + \sum log( 1+{e}^{X_t\bullet\beta}) + \frac{1}{2}\delta^t S_t^{-1}\delta\\)

where \\(\delta=(\beta - \mu_{t-1})\\)
renders as:
Include HTML
You can include HTML in a notebook by using the functiondisplayHTML.SeeHTML, D3, and SVG in notebooksfor an example of how to do this.
Note
ThedisplayHTMLiframe is served from the domaindatabricksusercontentand the iframe sandbox includes theallow-same-originattribute.databricksusercontentmust be accessible from your browser. If it is currently blocked by your corporate network, it must added to an allow list.
Link to other notebooks
You can link to other notebooks or folders in Markdown cells using relative paths. Specify thehref
attribute of an anchor tag as the relative path, starting with a$and then follow the same
pattern as in Unix file systems:
%md
<a href= "$./myNotebook" >Link to notebook in same folder as current notebook</a>
<a href= "$../myFolder" >Link to folder in parent folder of current notebook</a>
<a href= "$./myFolder2/myNotebook2" >Link to nested notebook</a>
Feedback
Coming soon: Throughout 2024 we will be phasing out GitHub Issues as the feedback mechanism for content and replacing it with a new feedback system. For more information see:https://aka.ms/ContentUserFeedback.
Submit and view feedback for